Table of Contents
- Introduction
- Understanding Defender for Endpoint Modes
- Migration Strategy
- Challenges and Solutions
- Key Takeaways
- PowerShell Script for SEP Removal
Introduction
I recently worked on a project for a client who wanted to migrate their endpoint security solution from Symantec Endpoint Protection (SEP) to Microsoft Defender for Business (MDB). This is the Defender for Endpoint (MDE) plan included in the Business Premium license, which they aimed to maximise the value of. The client’s devices were fully managed with Intune, comprising a mix of hybrid and Entra ID-joined endpoints.
In this blog, I’ll share the process we followed, challenges we encountered, and how we overcame them, including a PowerShell script I created to streamline the migration.
Understanding Defender for Endpoint Modes
One of the standout features of Microsoft Defender is its flexibility in running modes. Let’s explore two key modes that make migrations like this one a breeze.
Passive Mode
Defender’s Passive Mode activates automatically when a device is onboarded to Defender for Endpoint and a third-party antivirus (AV) solution is already installed. In this mode, Microsoft Defender Antivirus (MDAV) disables its AV features, such as file scanning and threat remediation, recognising the presence of another AV solution.
This means there’s no need to uninstall Defender when using a third-party solution—it automatically goes into hibernation. Likewise, if you uninstall the third-party AV, Defender seamlessly switches back to Active Mode. A quick note: Passive Mode is only automatically enabled for desktop operating systems; Windows Server requires manual entry of a registry key to enable the feature.
EDR in Block Mode
EDR (Endpoint Detection and Response) in Block Mode builds upon Passive Mode. While MDAV remains disabled, EDR capabilities stay active. This means post-breach functionality, such as alerting and remediation, continues to operate via Defender’s EDR service, Microsoft Sense.
This mode supports a defence-in-depth approach, providing an additional layer of protection against malicious artefacts even if Defender isn’t the primary endpoint security solution.
Migration Strategy
For this client, the migration followed three straightforward steps:
- **Enable EDR in Block Mode: **This acted as a safety net during the transition, ensuring continuous EDR protection while SEP was still active.
- **Onboard devices to Defender for Endpoint: **Using Intune, we configured an Endpoint Detection and Response (EDR) policy to onboard devices to Defender for Business, along with appropriate configuration policies for MDAV, Firewall and Attack Surface Reduction.
- **Uninstall Symantec Endpoint Protection: **After onboarding, we disabled Tamper Protection and Password Protection via SEPM policy, then removed SEP using our platform script to fully enable Defender’s Active Mode.
Step-by-Step Process
Microsoft’s documentation clearly outlines the recommended steps:
- Update your devices, and prep your team.
- Configure Defender policies within Intune.
- Deploy policies to a pilot group of devices.
- Onboard devices to Microsoft Defender for Endpoint.
- Uninstall 3rd party solution.
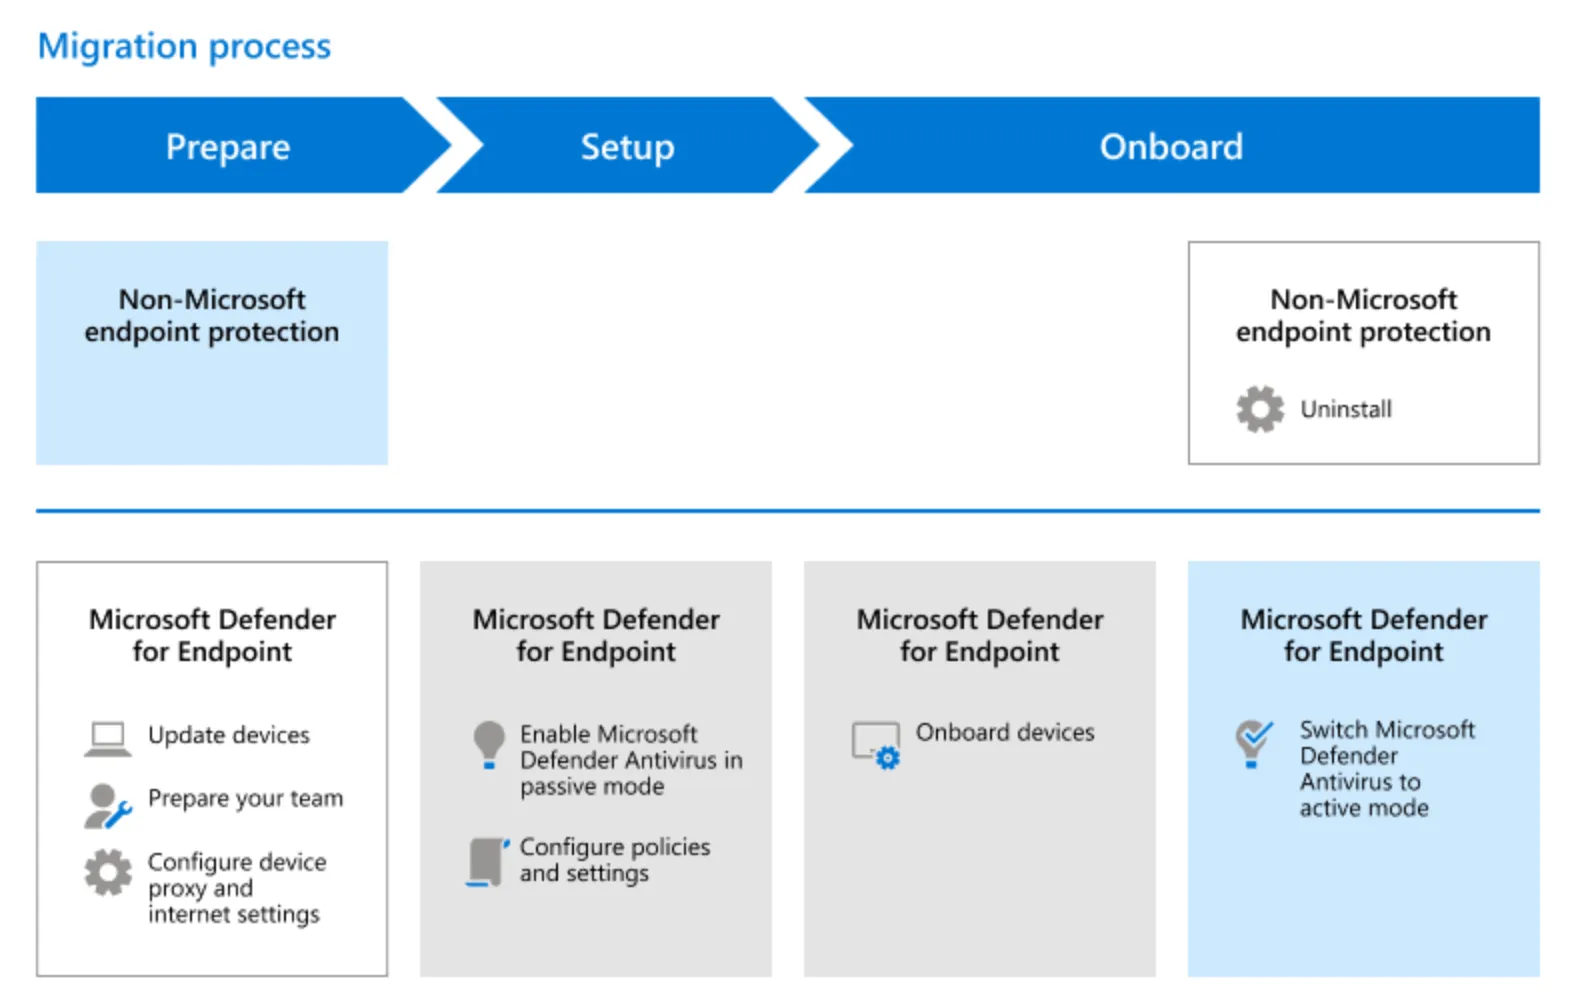
As we Intune managed the entire process, the transition was smooth and served as a great opportunity to upskill the team.
Challenges and Solutions
Lack of Remote Uninstall for SEP
One surprising challenge was the lack of a remote uninstall option for SEP via the management portal. Previous AV solutions I’ve migrated from usually had either a cloud-based or on-premises dashboard to execute remote uninstall commands.
Upon reviewing Broadcom’s documentation, I discovered that SEP removal requires either Group Policy or PowerShell. Since most of the client’s devices were cloud-native and Intune-managed, Group Policy wasn’t an option.
Using Intune and PowerShell for SEP Removal
To address this, I created a PowerShell script to uninstall SEP. This script was deployed using Intune’s script deployment feature, aligning with modern management practices. It would have been a better option to use remediation scripts here, but due to licensing we were limited. Don’t forget to disable Tamper Protection and Password Protection via SEPM policy, failing to do this would cause the uninstall to fail.
As soon as SEP was removed, Defender automatically activated, thanks to its Passive Mode capabilities. The script I developed is included below and available on my GitHub repository along with Intune deployment steps.
Key Takeaways
This project marked my first migration from Symantec Endpoint Protection, and while the lack of remote uninstall was disappointing, the experience highlighted the power of Microsoft’s security ecosystem, and the ease of use around Intune.
The combination of Defender’s Passive Mode, EDR in Block Mode, and Intune’s modern management capabilities ensured a seamless transition. The PowerShell script is now a reusable asset for future migrations, and I’m thrilled to have helped another client begin their Microsoft security journey.
PowerShell Script for SEP Removal
<#
.SYNOPSIS
    Uninstalls Symantec Endpoint Protection (SEP) from local machine.

.DESCRIPTION
    Script Name: Uninstall-SEP.ps1
    Version: 1.0
    Creator: Nathan Hutchinson
    Website: natehutchinson.co.uk
    GitHub: https://github.com/NateHutch365

    This script automates the uninstallation of Symantec Endpoint Protection (SEP) and logs the results
    to a file. It can be deployed as a platform script in Microsoft Intune.

.NOTES
    Intune Deployment Configuration:
    - Run this script using logged on credentials: No
    - Enforce script signature check: No
    - Run script in 64 bit PowerShell Host: No

    Prerequisites:
    - Tamper Protection must be disabled via SEPM policy before deployment
    - Password Protection must be disabled via SEPM policy before deployment
#>

# Define the name of the product to uninstall
$productName = "Symantec Endpoint Protection"

# Get the local computer name
$computerName = $env:COMPUTERNAME

# Define the output file path
$outputFile = "C:\Temp\UninstallResults.txt"

# Ensure the directory exists
$outputDirectory = [System.IO.Path]::GetDirectoryName($outputFile)
if (!(Test-Path -Path $outputDirectory)) {
    New-Item -ItemType Directory -Path $outputDirectory | Out-Null
}

# Initialize the result message
$resultMessage = ""

# Attempt to find Symantec Endpoint Protection package(s) on the local computer
$sepPackages = Get-Package -Name $productName -ErrorAction SilentlyContinue

if ($sepPackages) {
    # Uninstall Symantec Endpoint Protection on the local computer
    foreach ($sepPackage in $sepPackages) {
        $uninstallResult = $sepPackage | Uninstall-Package -Force

        if ($uninstallResult) {
            $resultMessage = "$computerName - $productName - Successfully uninstalled"
        } else {
            $errorCode = $LASTEXITCODE

            if ($errorCode -eq 3010) {
                $resultMessage = "$computerName - $productName - Uninstallation completed with exit code 3010 (Reboot required)"
            } else {
                $resultMessage = "$computerName - $productName - Failed to uninstall with exit code $errorCode"
            }
        }

        # Write the result to the output file
        $resultMessage | Out-File -FilePath $outputFile -Append
    }
} else {
    $resultMessage = "$computerName - $productName - Not found"
    $resultMessage | Out-File -FilePath $outputFile -Append
}

# Notify the user
Write-Host "Uninstall results have been saved to $outputFile"