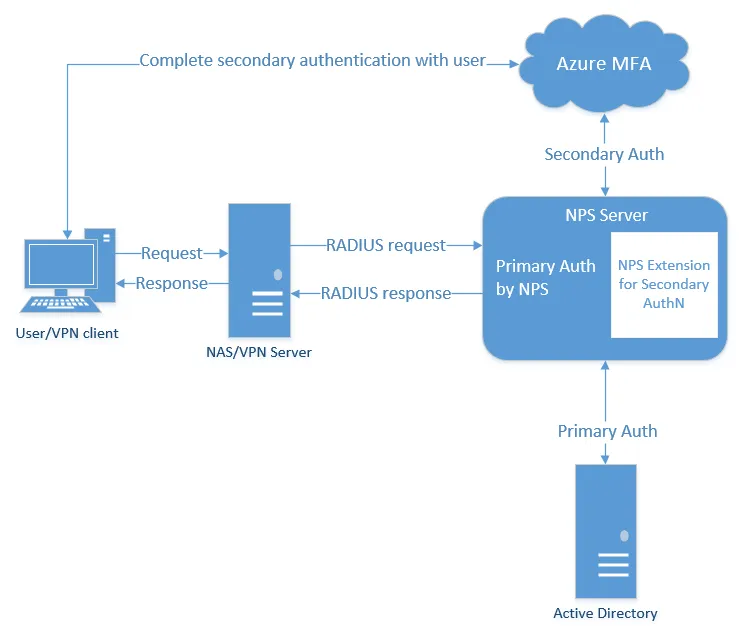
If like me you prefer to stay as close to the Microsoft stack as possible, it’s likely you’ll want to use Azure MFA to protect access to your on-premises resources such as, VPN and Remote Desktop Gateway. Other third-party solutions are available and may be a better fit for you but for my day-to-day user accounts that are synced to Azure AD I want them to use the MFA provided there as it saves on cost and it’s likely a solution they are already using.
It’s worth noting that I do not recommend this method if you want to protect local administrator accounts as this solution requires you to sync the users to Azure AD and well, syncing your domain admin to 365 is probably (definitely) a bad idea.
Microsoft historically required you to configure an on-premises MFA server for this to work but recently this has become much easier to achieve by using the cloud-based Azure MFA and Azure MFA NPS extension.
In my scenario we are using the WatchGuard SSL VPN and standard Remote Desktop Gateway however, this will work for any VPN server/client you use as long as it can be configured to work with RADIUS although Network Policy settings may vary, so keep this in mind as you might have some trial and error, as I did.
Following the below MSFT provided guides may get you where you need to be however, we found that there were some caveats to this, particularly around having multiple network policies (one for VPN and one for RDG), so read on.
Quick shout out to @PanicAcid whom thoroughly enjoyed tearing his hair out with me trying to get this working. You can find more from him on his site here: PCQuickTips.net – Things I struggled with so you don’t have to!
Resources
You should familiarize yourself with the following MSFT documentation beforehand.
Prerequisites
- Users must be licensed for Azure MFA (Azure AD Premium P1 minimum)
- Windows Server 2012 minimum
- You must install the following libraries on the servers with the NPS roles (minimum two) - Visual C++ Redistributable for Visual Studio 2015
- Every user that requires targeting must be synced from AD using AD Connect or Azure Cloud Sync and registered for Azure MFA - Users must register an authentication app for push notifications, this solution only works for push notification, it does NOT work with OTP/TOTP codes - Users can register at the following link: https://aka.ms/mfasetup
- The NPS server must be able to communicate with the following URLs over port 80 and 443 - https://strongauthenticationservice.auth.microsoft.com - https://strongauthenticationservice.auth.microsoft.us - https://strongauthenticationservice.auth.microsoft.cn - https://adnotifications.windowsazure.com - https://login.microsoftonline.com - https://credentials.azure.com - https://login.microsoftonline.com - https://provisioningapi.microsoftonline.com - https://aadcdn.msauth.net - https://www.powershellgallery.com - https://go.microsoft.com - https://aadcdn.msftauthimages.net
- You must have your RD Gateway roles on a separate server to your NPS/RADIUS server (the NPS/RADIUS server that will have the Azure MFA NPS Extension installed)
- You will need your Azure tenant ID, available on the overview page of the Azure AD portal
Before we get further into this post it is assumed that we already have a working RD Gateway and VPN, only changes required to make this work will be included. In this scenario I have a single RD Gateway with the NPS role installed and a secondary server with the NPS role installed which will act as my Azure MFA NPS server.
NPS Role
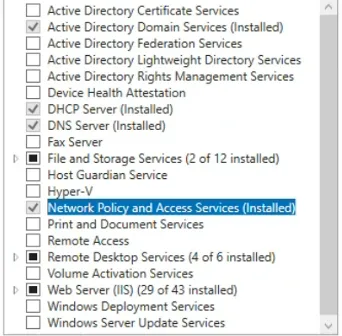
The NPS role must be on both the RDG server and the dedicated Azure MFA NPS server - go ahead and install this role on all required servers.
NPS/Azure MFA Extension installation
Once you have your chosen NPS server that will host the NPS extension go ahead and install the extension following the steps here: Use Azure AD Multi-Factor Authentication with NPS - Azure Active Directory - Microsoft Entra | Microsoft Learn or follow the below.
- Download the NPS Extension
- Copy the binary to the Network Policy Server you want to configure.
- Run setup.exe and follow the installation instructions. If you encounter errors, make sure that the libraries from the prerequisite section were successfully installed.
Run the PowerShell script
Next, you need to configure certificates for use by the NPS extension to ensure secure communications and assurance. The NPS components include a Windows PowerShell script that configures a self-signed certificate for use with NPS. The script performs the following actions:
- Creates a self-signed certificate
- Associates public key of certificate to service principal on Azure AD
- Stores the cert in the local machine store
- Grants access to the certificate’s private key to the network user
- Restarts Network Policy Server service
To use the script, provide the extension with your Azure AD Admin credentials and the Azure AD tenant ID that you copied earlier. Run the script on each NPS server where you installed the NPS extension. Then do the following:
Open an administrative Windows PowerShell prompt.
At the PowerShell prompt, type
cd 'c:\Program Files\Microsoft\AzureMfa\Config'Press ENTER.
Then type
UPDATE: You may be required to first enable TLS 1.2 for PowerShell to be able to connect and download properly.
[Net.ServicePointManager]::SecurityProtocol = [Net.SecurityProtocolType]::Tls12.\AzureMfaNpsExtnConfigSetup.ps1Press ENTER. The script checks to see if the Azure Active Directory PowerShell module is installed. If not installed, the script installs the module for you.
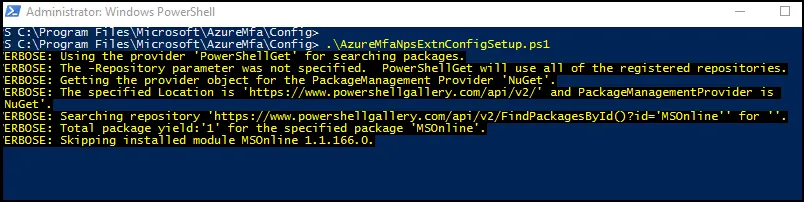
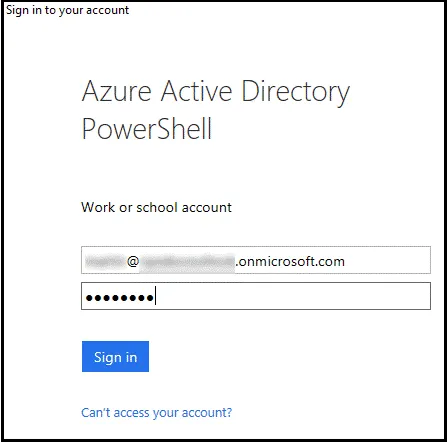
After the script verifies the installation of the PowerShell module, it displays the Azure Active Directory PowerShell module dialog box. In the dialog box, enter your Azure AD admin credentials and password, and click Sign In.
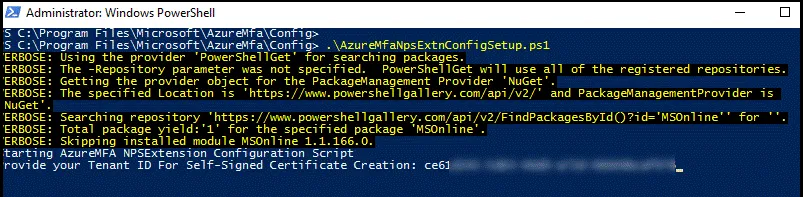
When prompted, paste the Tenant ID you copied to the clipboard earlier, and press ENTER.
The script creates a self-signed certificate and performs other configuration changes. The output should be like the image shown below.
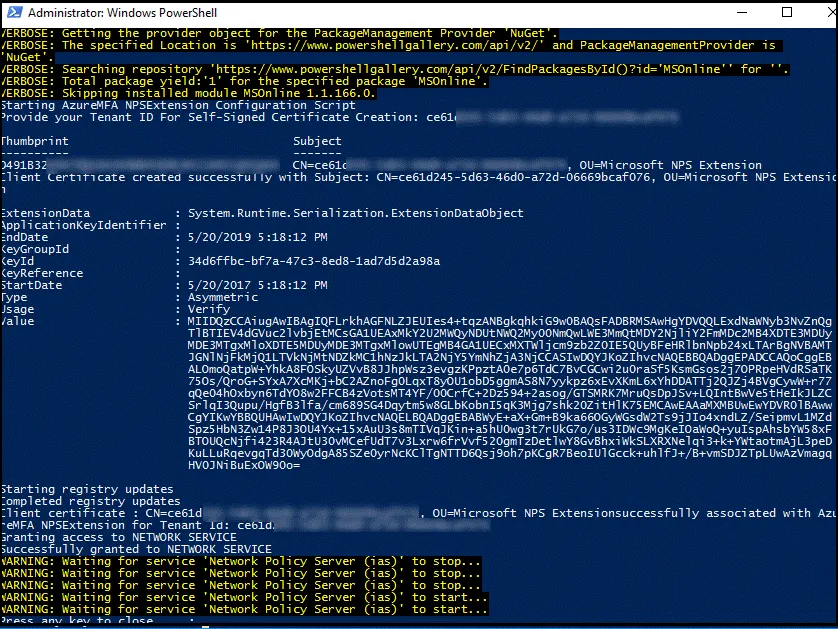
The Azure MFA extension is now enabled.
IMPORTANT! Microsoft recently made a change to Azure MFA and the NPS extension which in the default configuration means users will not receive an Approve/Deny push notification.
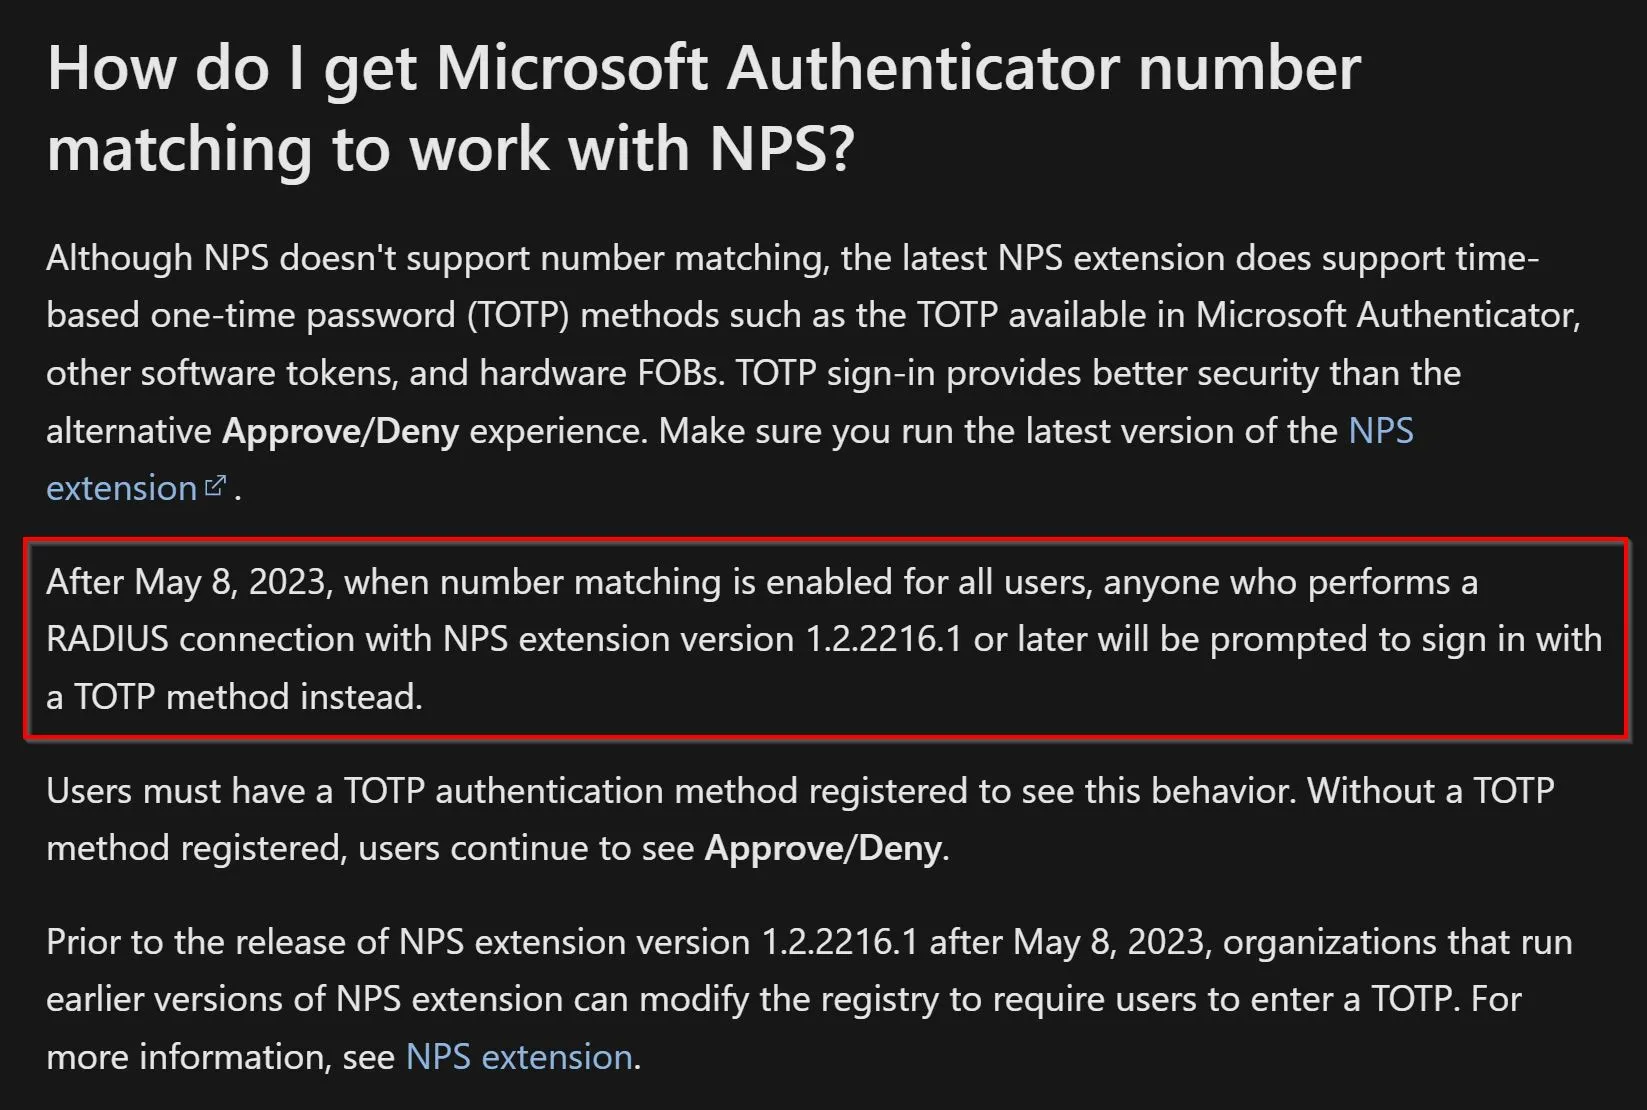
In my testing when the Microsoft Authenticator app is configured, by default it will also configure a TOTP within the app, herein lies the problem.

To ensure the Approve/Deny push notifications work as expected you must add the following reg key on your NPS server that has the MFA extension installed.
HKEY_LOCAL_MACHINE\SOFTWARE\Microsoft\AzureMfa
Create the following String/Value pair:
- Name: OVERRIDE_NUMBER_MATCHING_WITH_OTP
- Value = FALSE
Restart the NPS Service
RD Gateway
Assuming you already have RDG in place, go ahead and open up RD Gateway Manager.

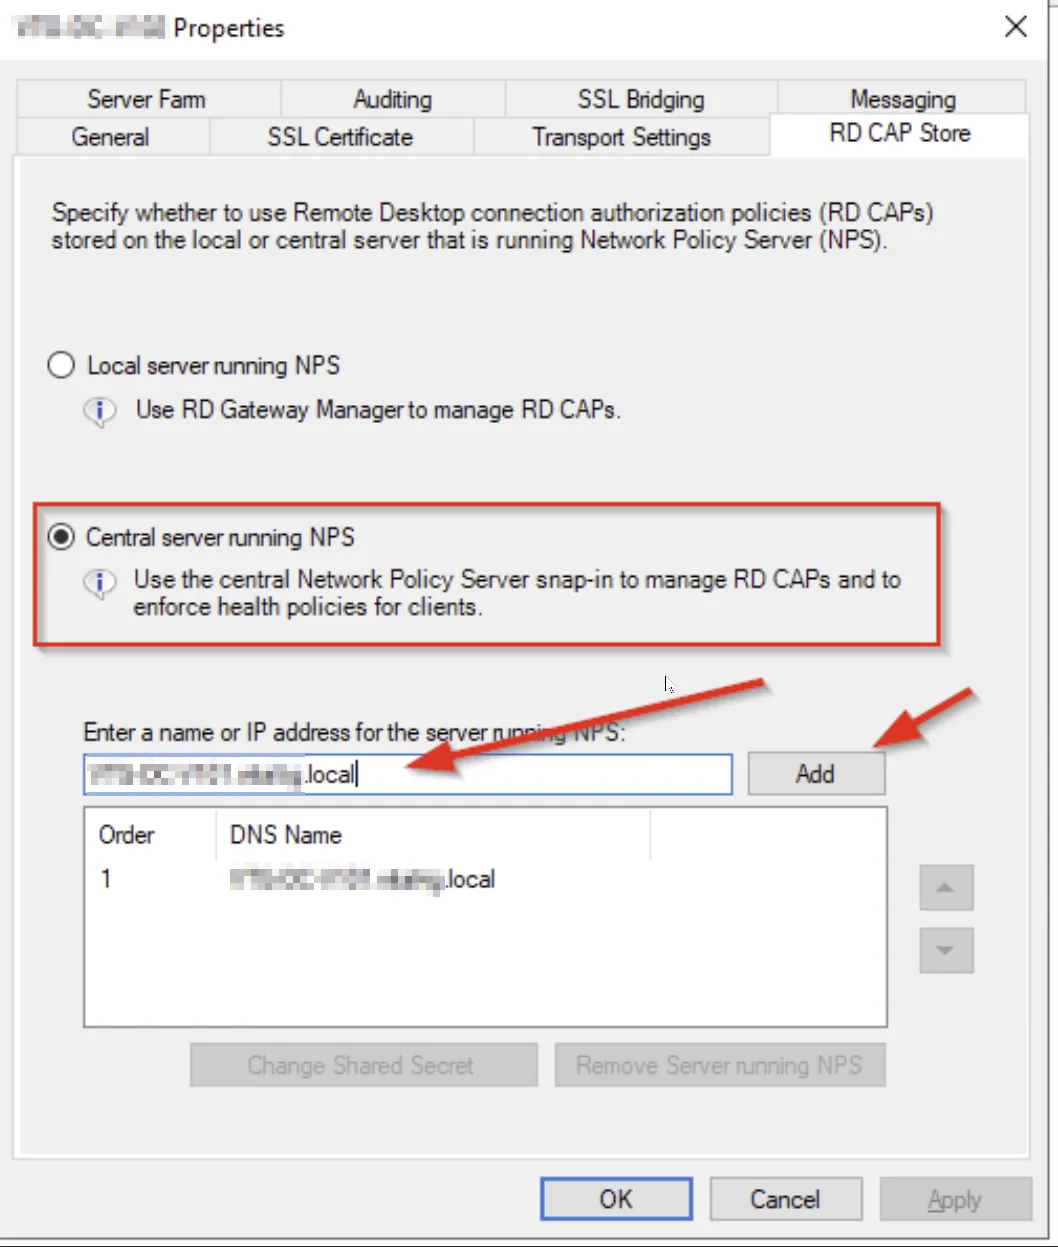
Next, we are going to configure the RDG connection authorization policies to use a central store, this is important otherwise the RDG will not be using the CAPs managed by your NPS server.
Open the Properties of the RDG server
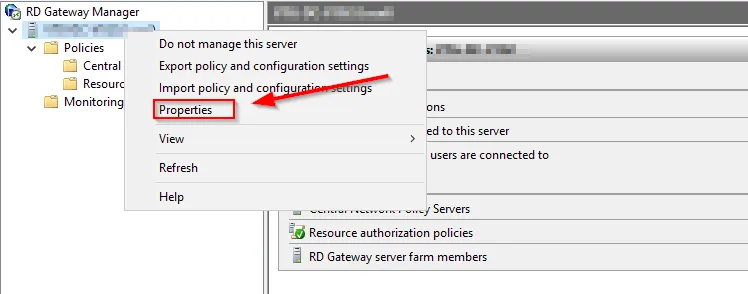
Select the RD CAP store tab and update the setting to **Central server running NPS **and add either the DNS Hostname of your NPS/Azure MFA server or use IP address.
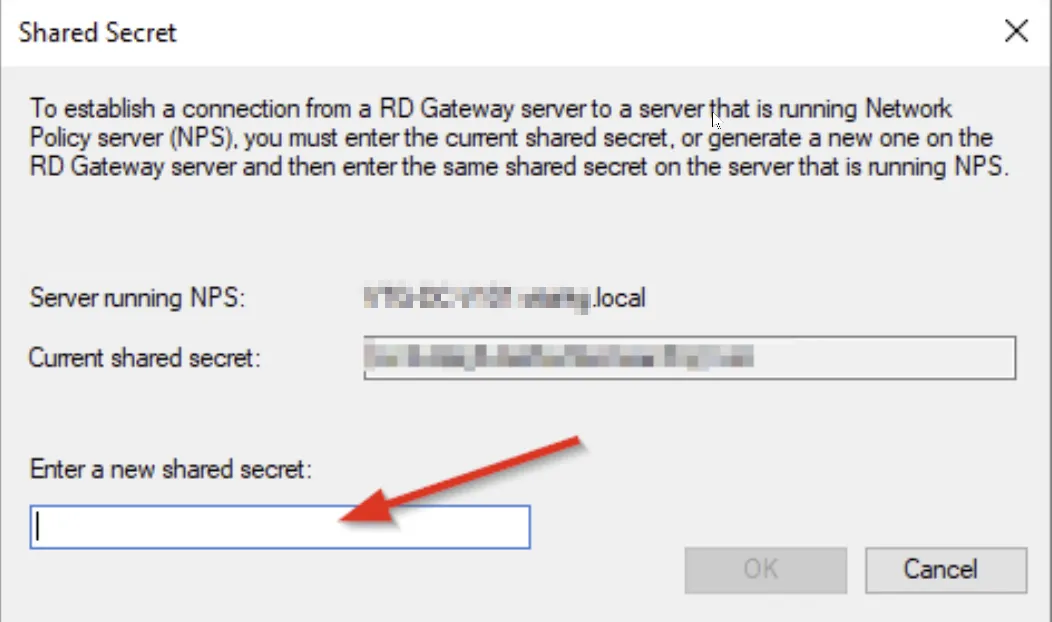
When you add the server you will be prompted to enter a shared secret, create one and keep a copy of it, select OK once done.
You may already have a Resource Authorization Policy configured, if not configure one.

Configure RADIUS timeout value on Remote Desktop Gateway NPS
Still on the RD Gateway server, open Server Manager. On the menu, click Tools, and then click Network Policy Server. Open up Remote RADIUS Server Groups and double click the group name** TS GATEWAY SERVER GROUP**
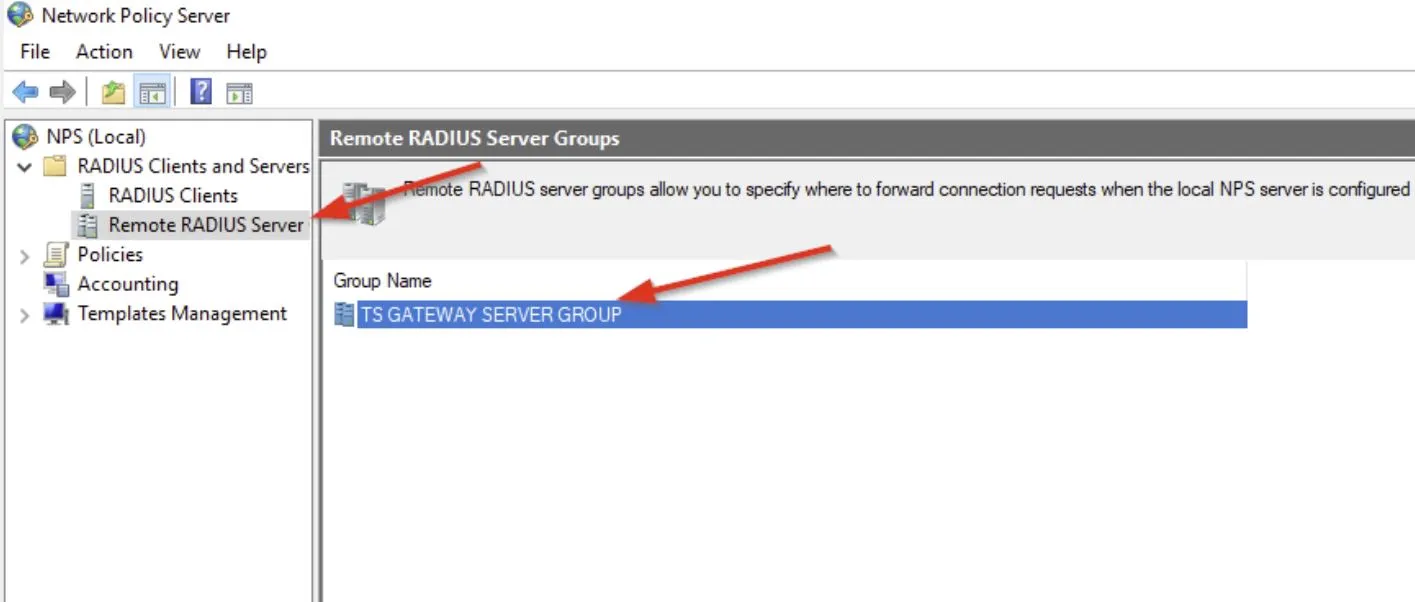
If your NPS/RADIUS server is not showing add this in now and select edit, otherwise just select edit.
To Add
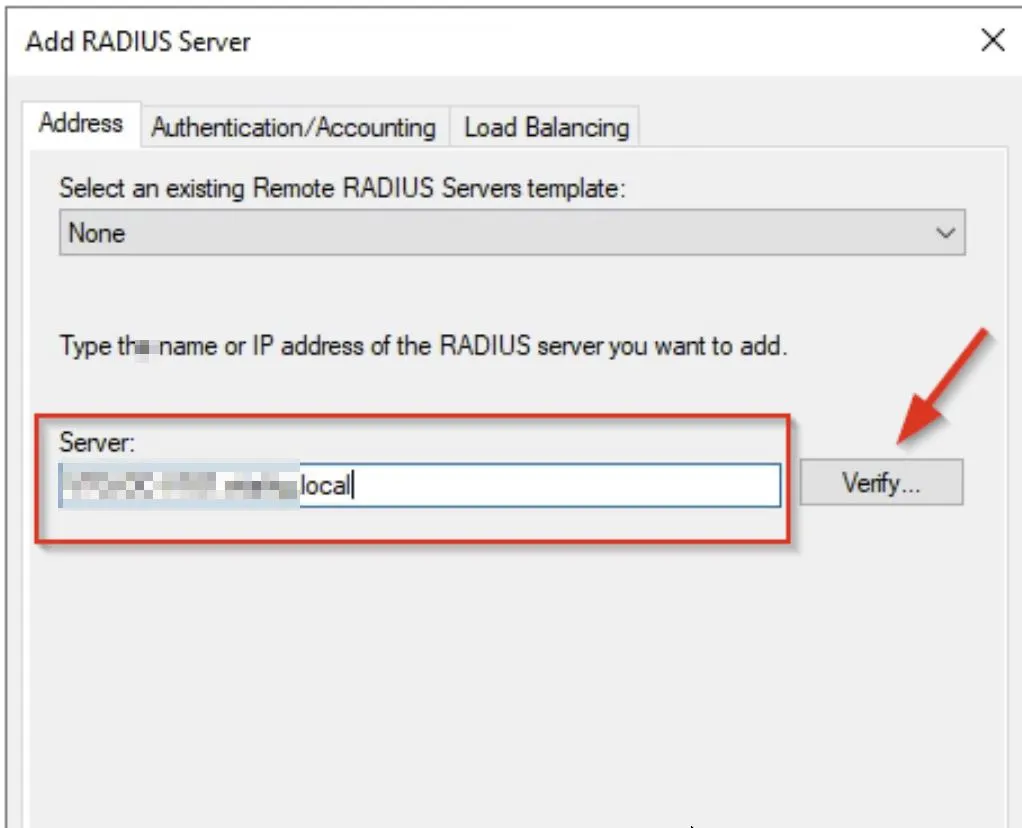
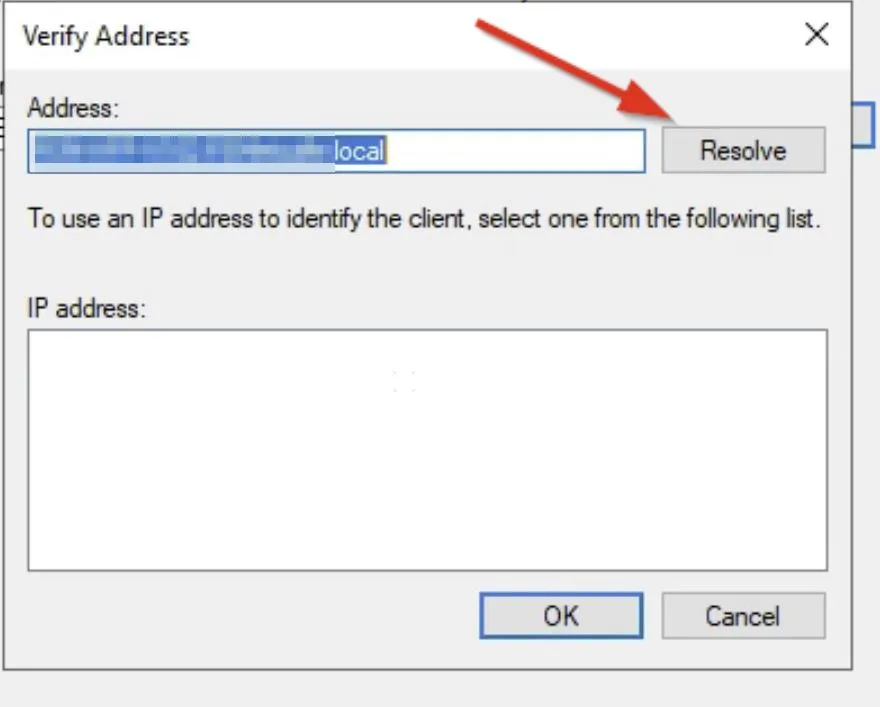
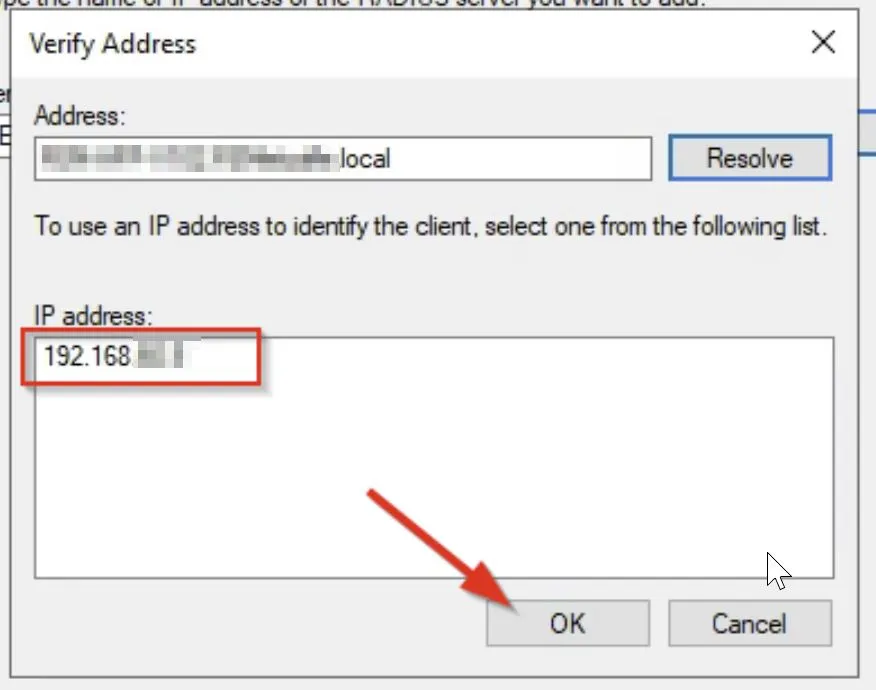
To Edit
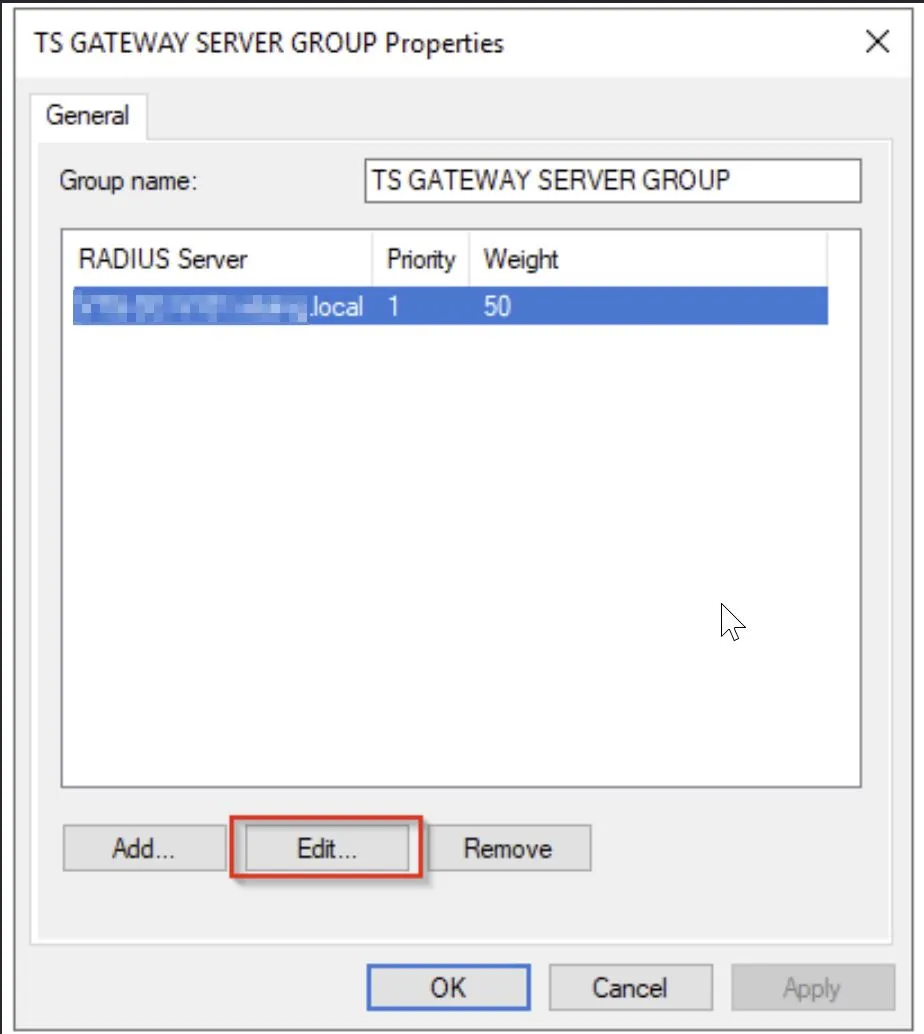
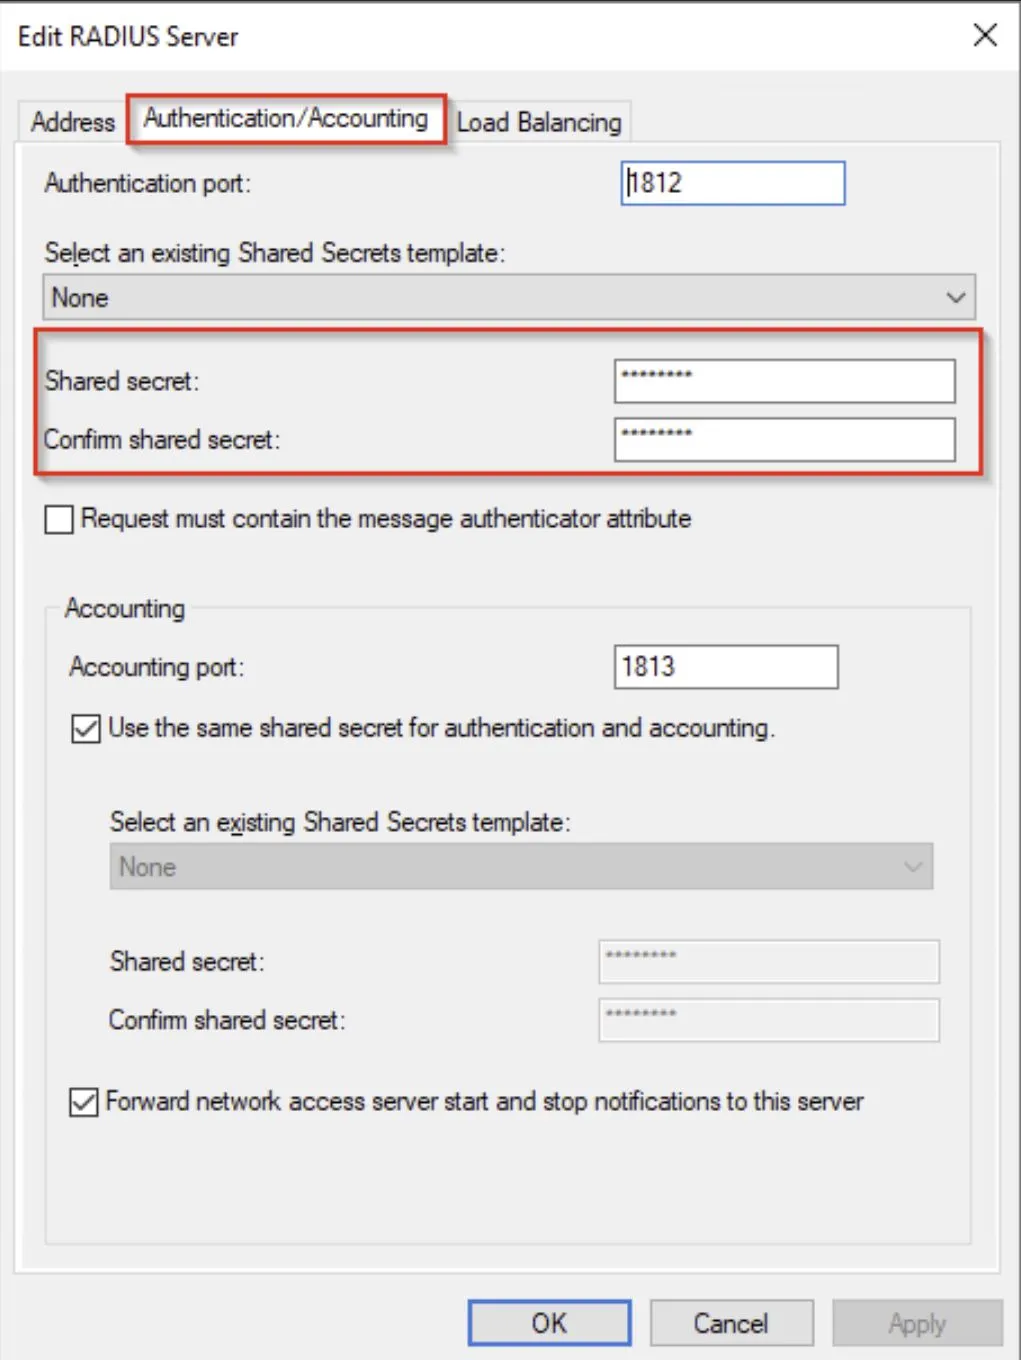
Select the Authentication/Accounting tab.
Add your shared secret from earlier in here.
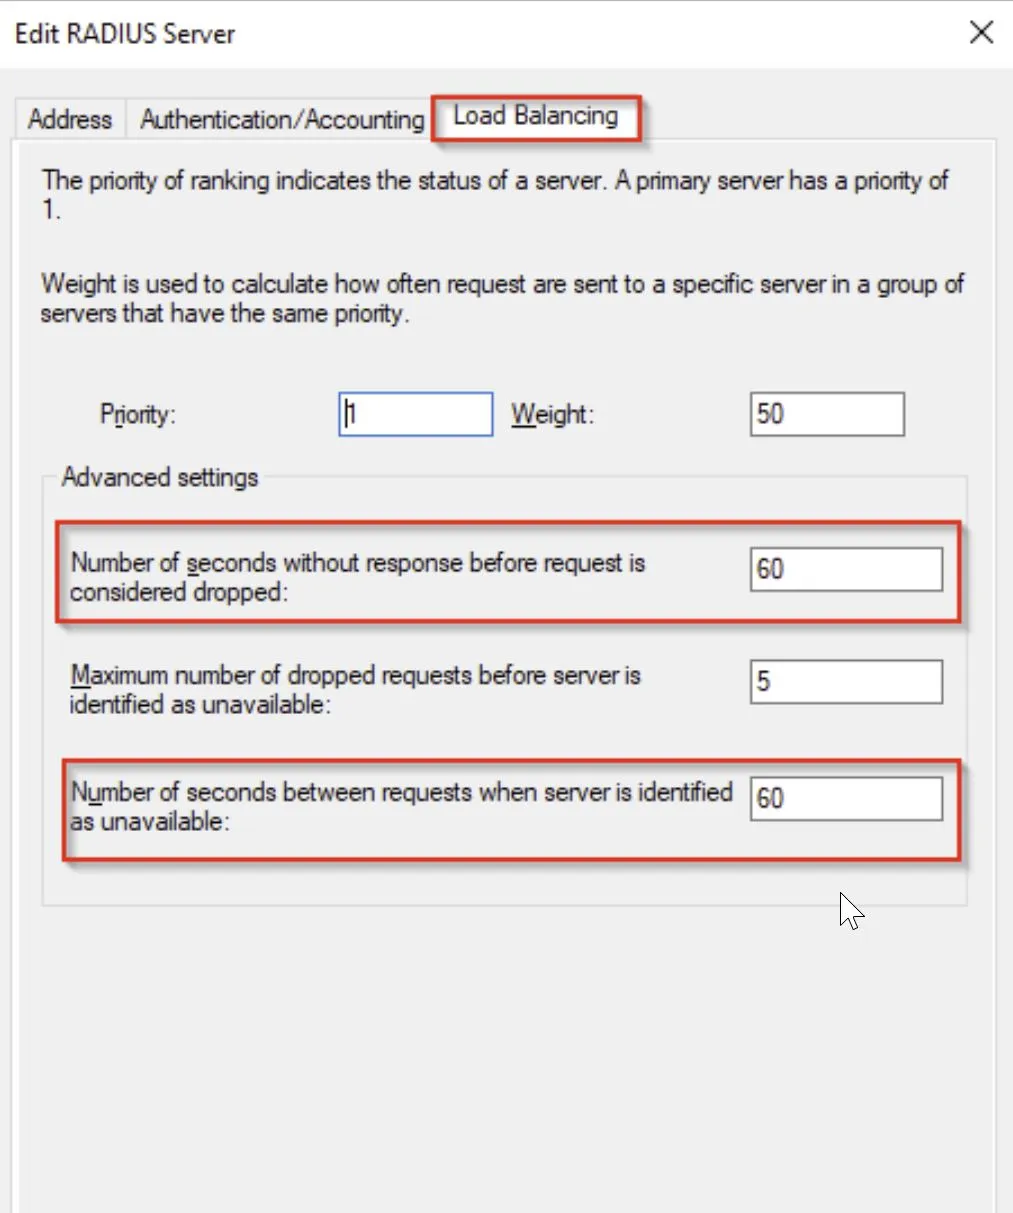
Select the Load Balancing tab and update to the below values (60).
Click OK twice to close the boxes down.
Verify Connection Request Policies
On the RD Gateway, in the NPS (Local) console, expand Policies, and select Connection Request Policies.
Double-click TS GATEWAY AUTHORIZATION POLICY.
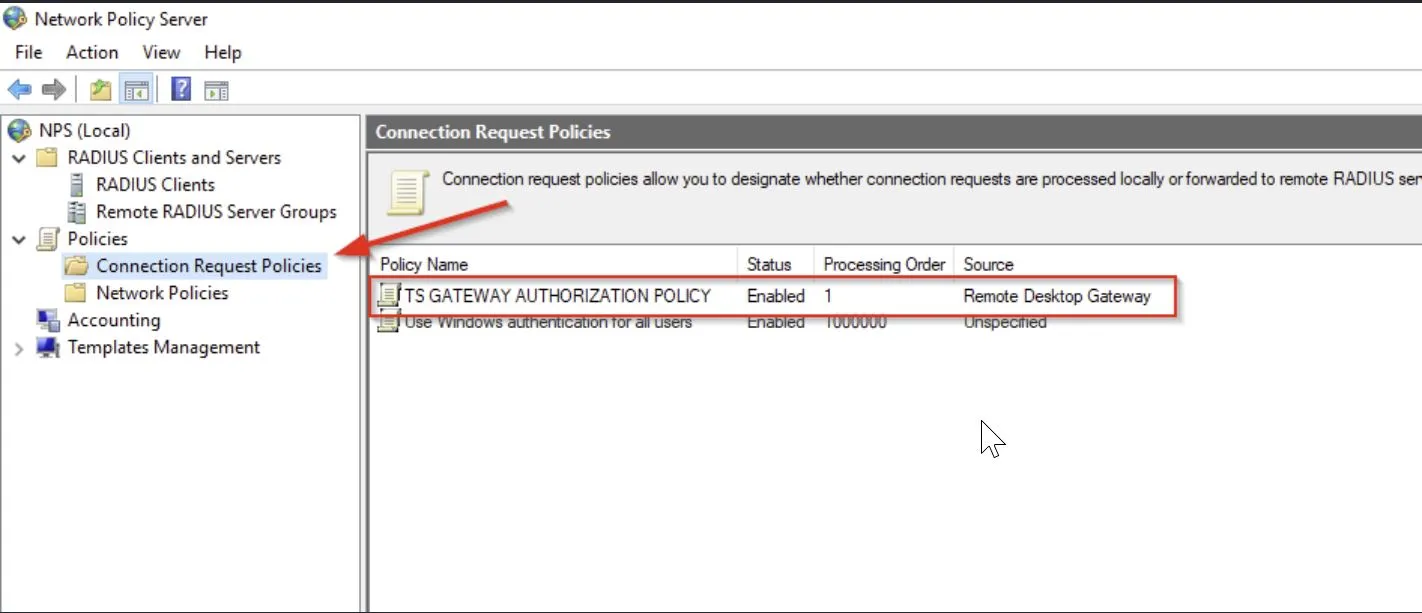
In the TS GATEWAY AUTHORIZATION POLICY properties dialog box, click the Settings tab.
On Settings tab, under Forwarding Connection Request, click Authentication. RADIUS client is configured to forward requests for authentication.
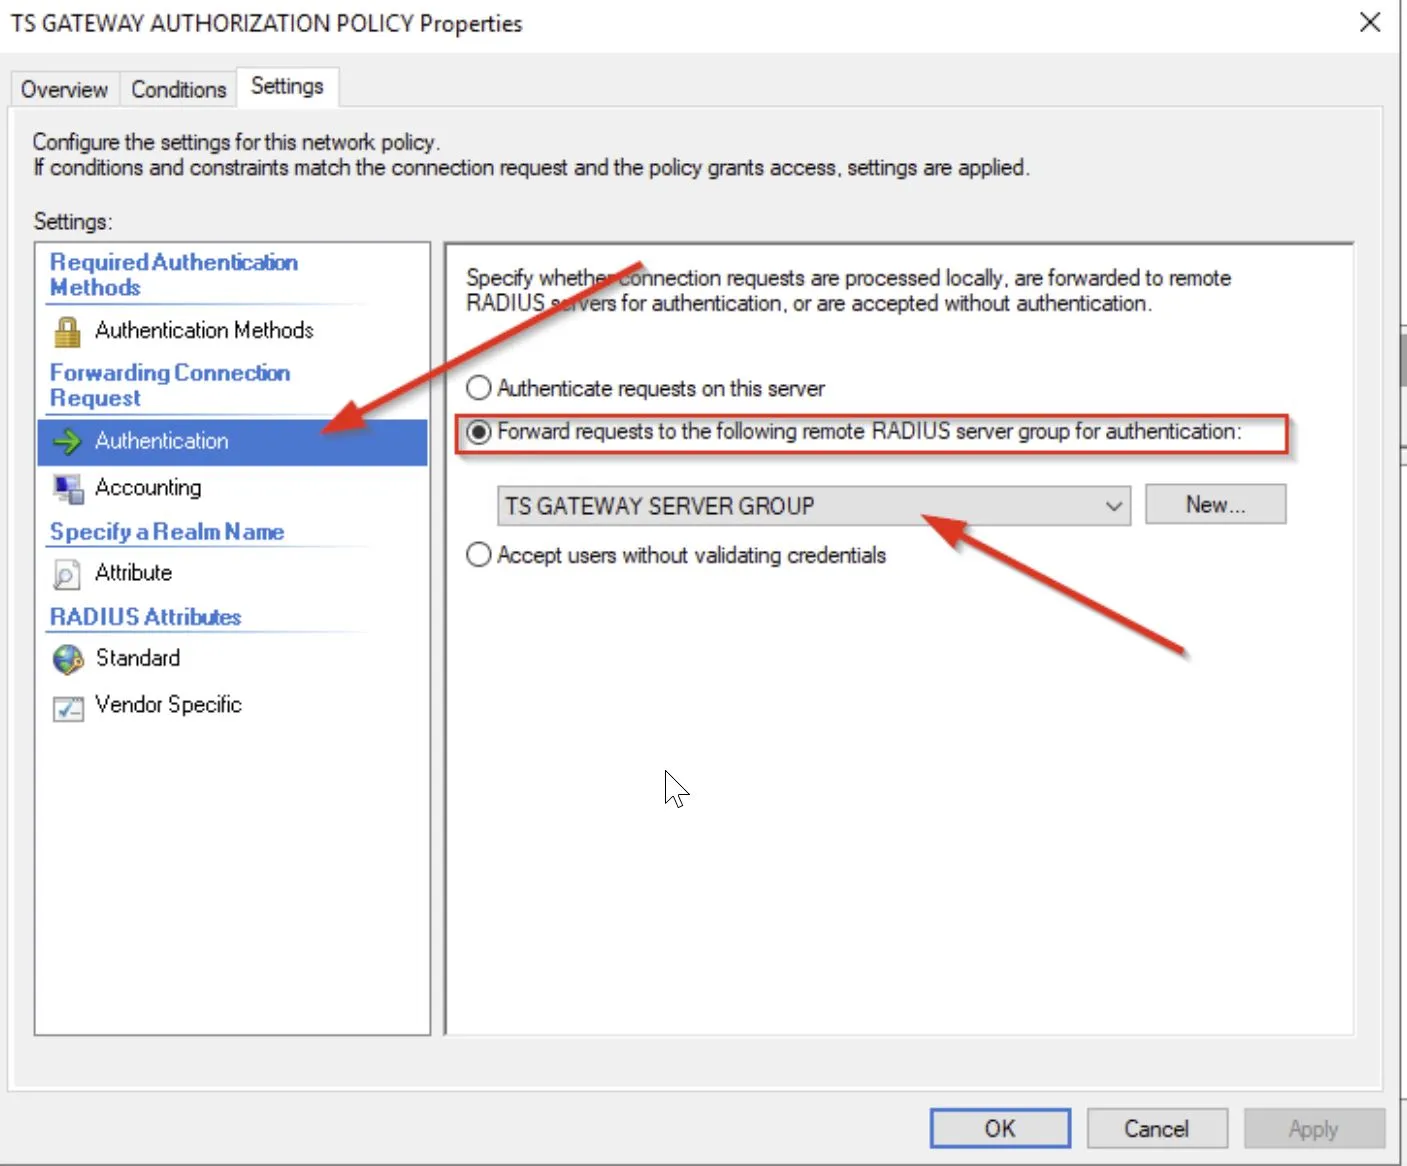
Confirm the changes.
You do not require any Network Policies on the RD Gateway server and can disable all of them.
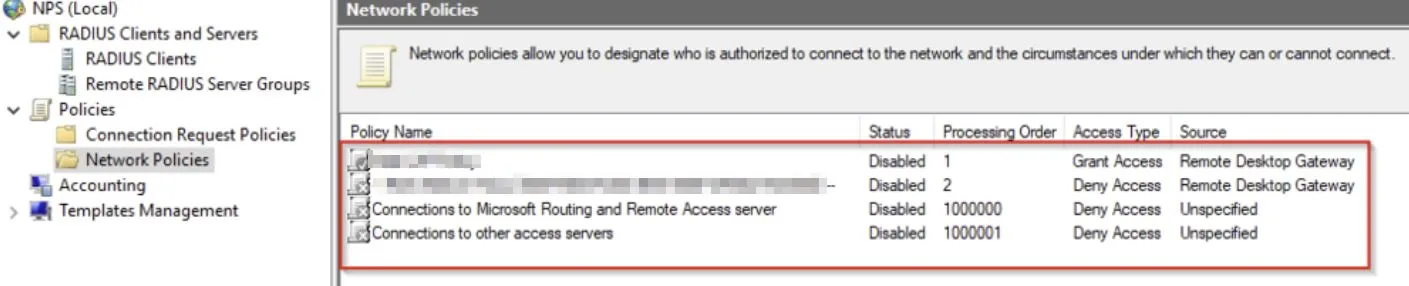
NPS/Azure MFA Server
The NPS server where the NPS extension is installed needs to be able to exchange RADIUS messages with the NPS server on the Remote Desktop Gateway. To enable this message exchange, you need to configure the NPS components on the server where the NPS extension service is installed.
To function properly in this scenario, the NPS server needs to be registered in Active Directory, if you have already done this you can skip this step.
- On the NPS server, open Server Manager.
- In Server Manager, click Tools, and then click Network Policy Server.
- In the Network Policy Server console, right-click NPS (Local), and then click Register server in Active Directory.
- Click OK two times.
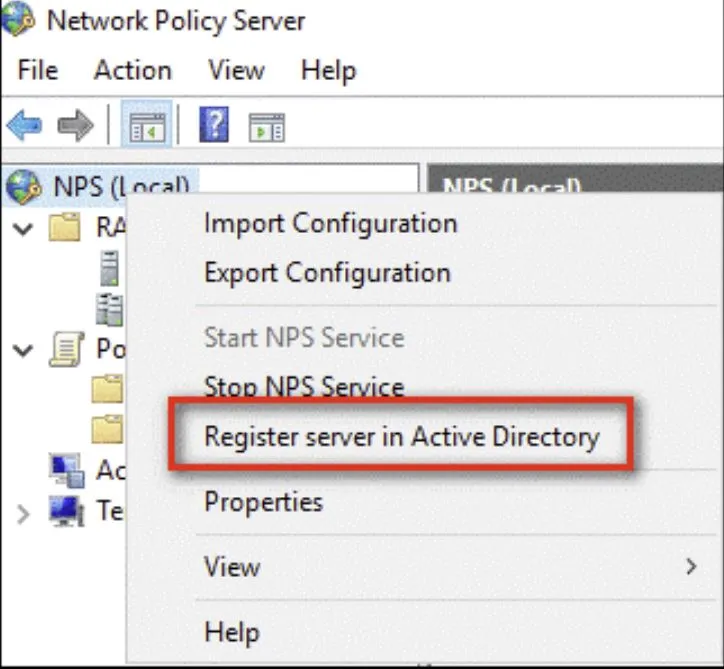
Create and configure RADIUS client
The Remote Desktop Gateway needs to be configured as a RADIUS client to the NPS server.
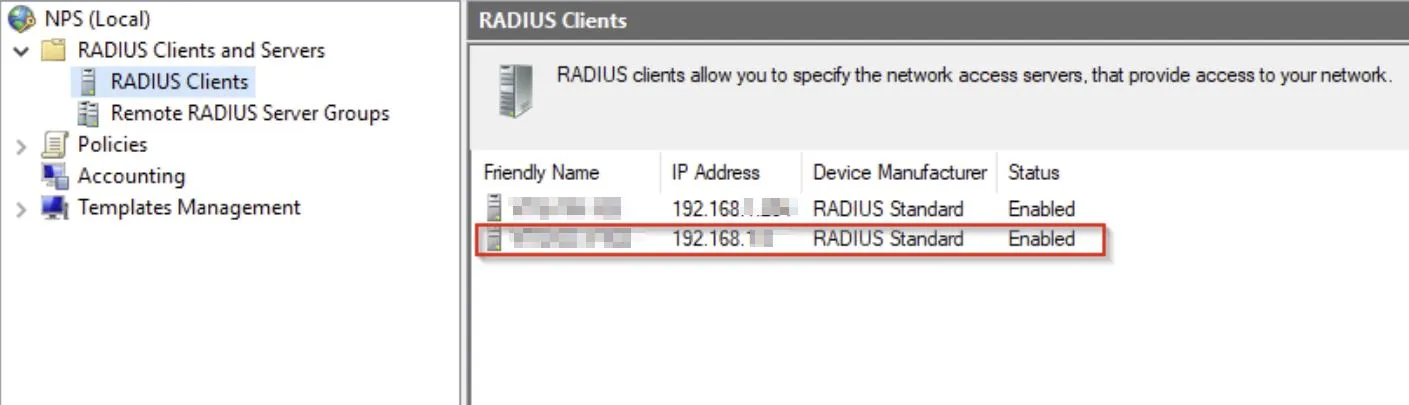
On the NPS server where the NPS extension is installed, in the NPS (Local) console, right-click RADIUS Clients and click New.
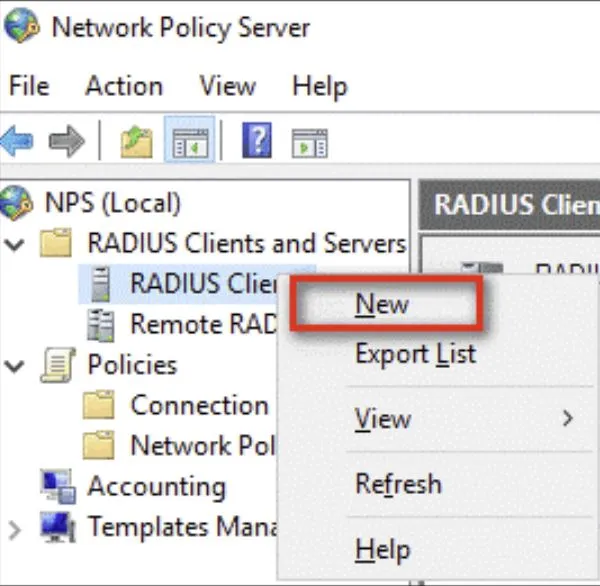
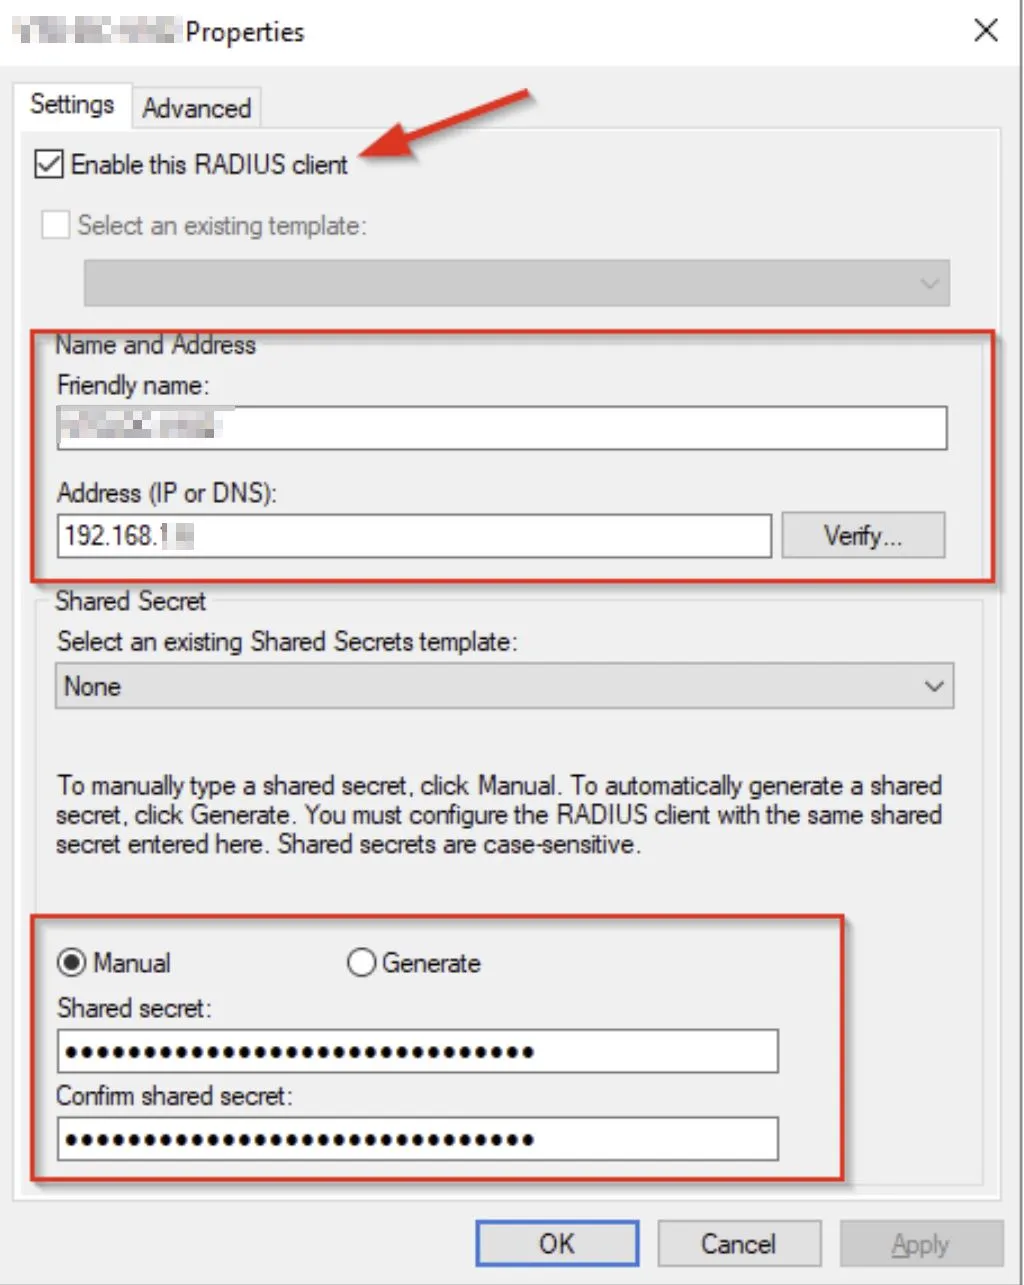
In the New RADIUS Client dialog box, provide a friendly name, such as SERVERNAME e.g (CON-DC-V101), and the IP address or DNS name of the Remote Desktop Gateway server.
In the Shared secret and the Confirm shared secret fields, enter the same secret that you used before.
Click OK to close the window.
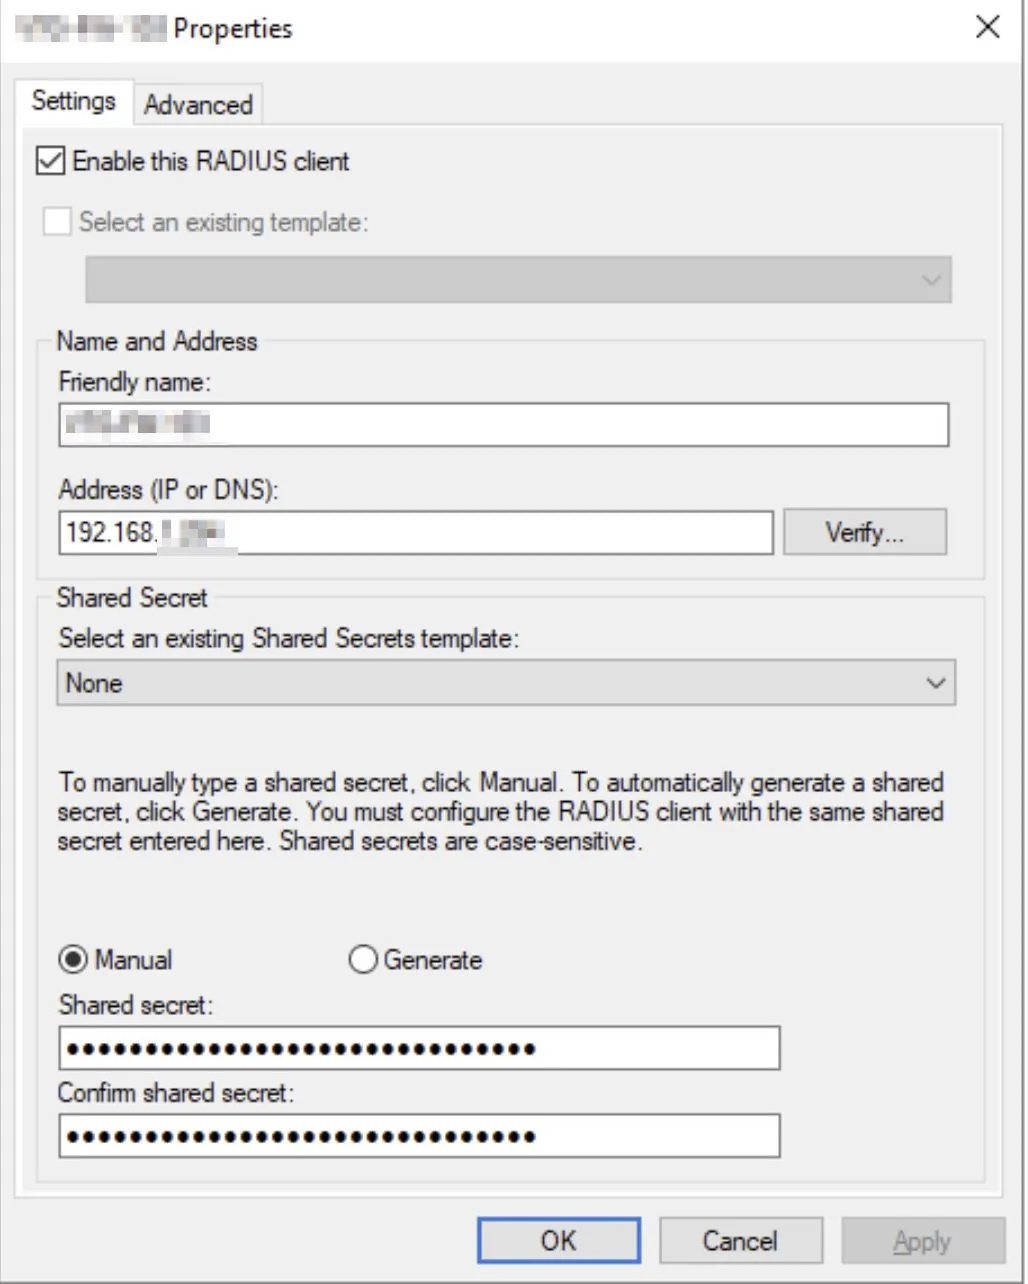
If not already, here is where you would also add the WatchGuard (or other firewall) to allow as a RADIUS client, you would add this in the same way.
Configure Network Policy
Recall that the NPS server with the Azure AD MFA extension is the designated central policy store for the Connection Authorization Policy (CAP). Therefore, you need to implement a CAP on the NPS server to authorize valid connections requests.
On the NPS Server, open the NPS (Local) console, expand Policies, and click Network Policies.
Right-click Connections to other access servers, and click Duplicate Policy.
RD Gateway Policy for Azure
Fill out the policy with the following settings (if there isn’t an image for a tab/setting then leave it as default)
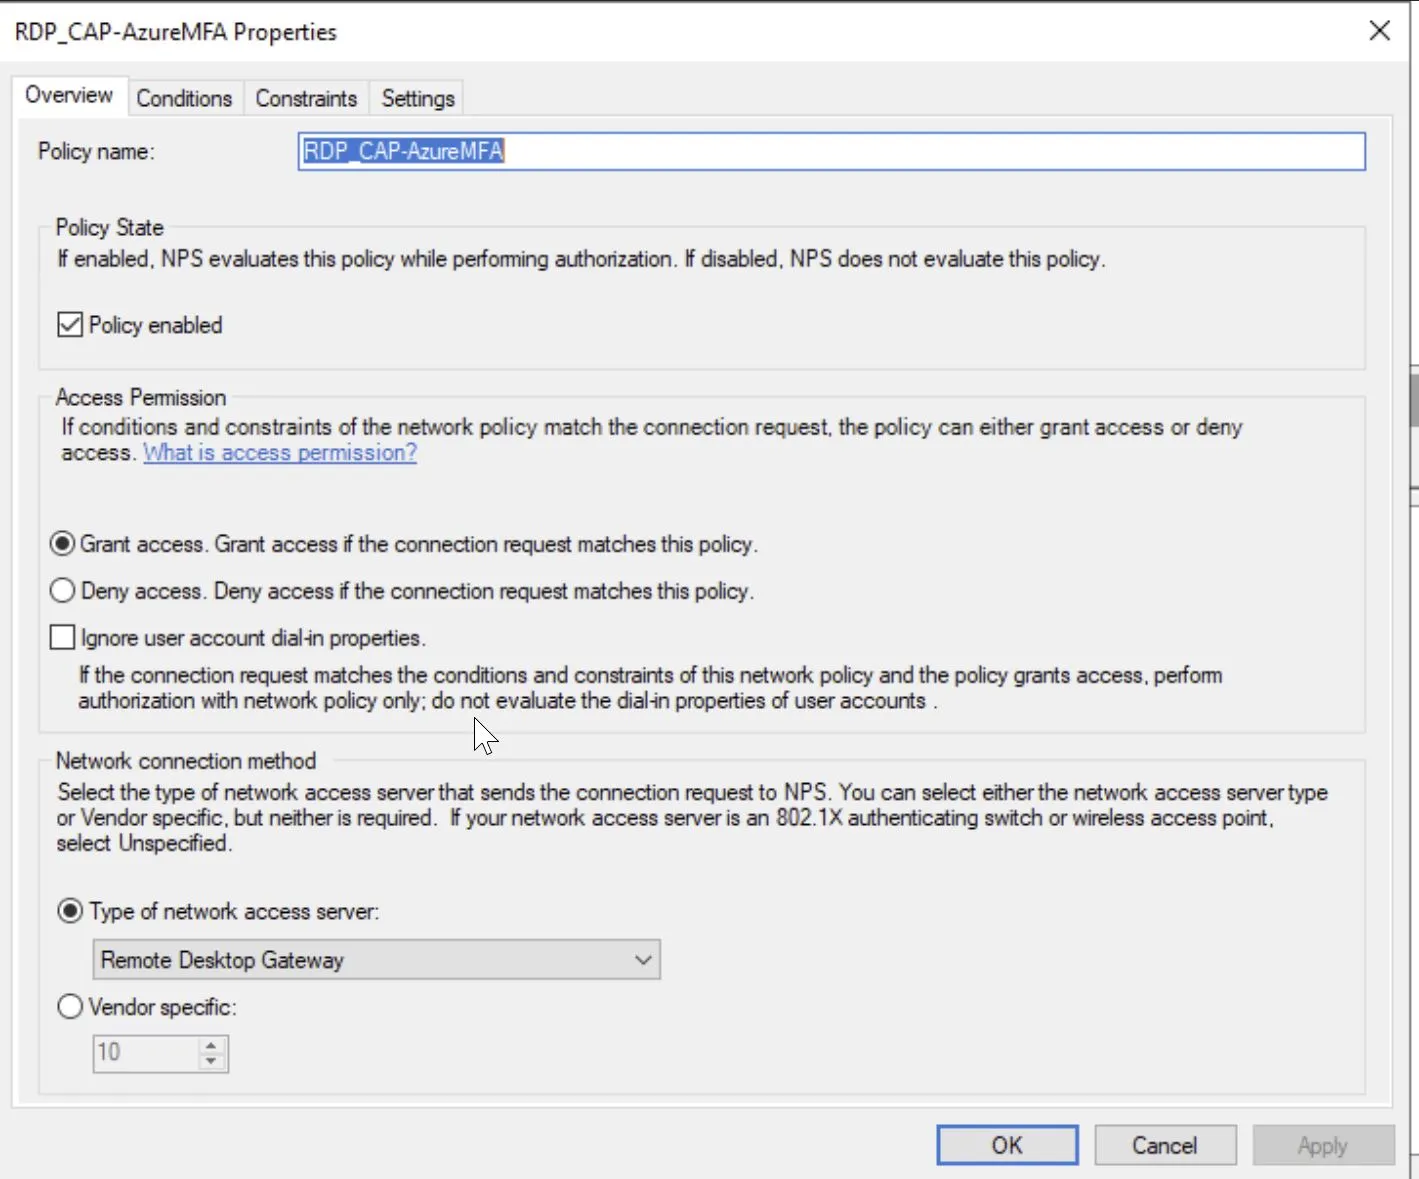
Make sure to add your RDP User group here.
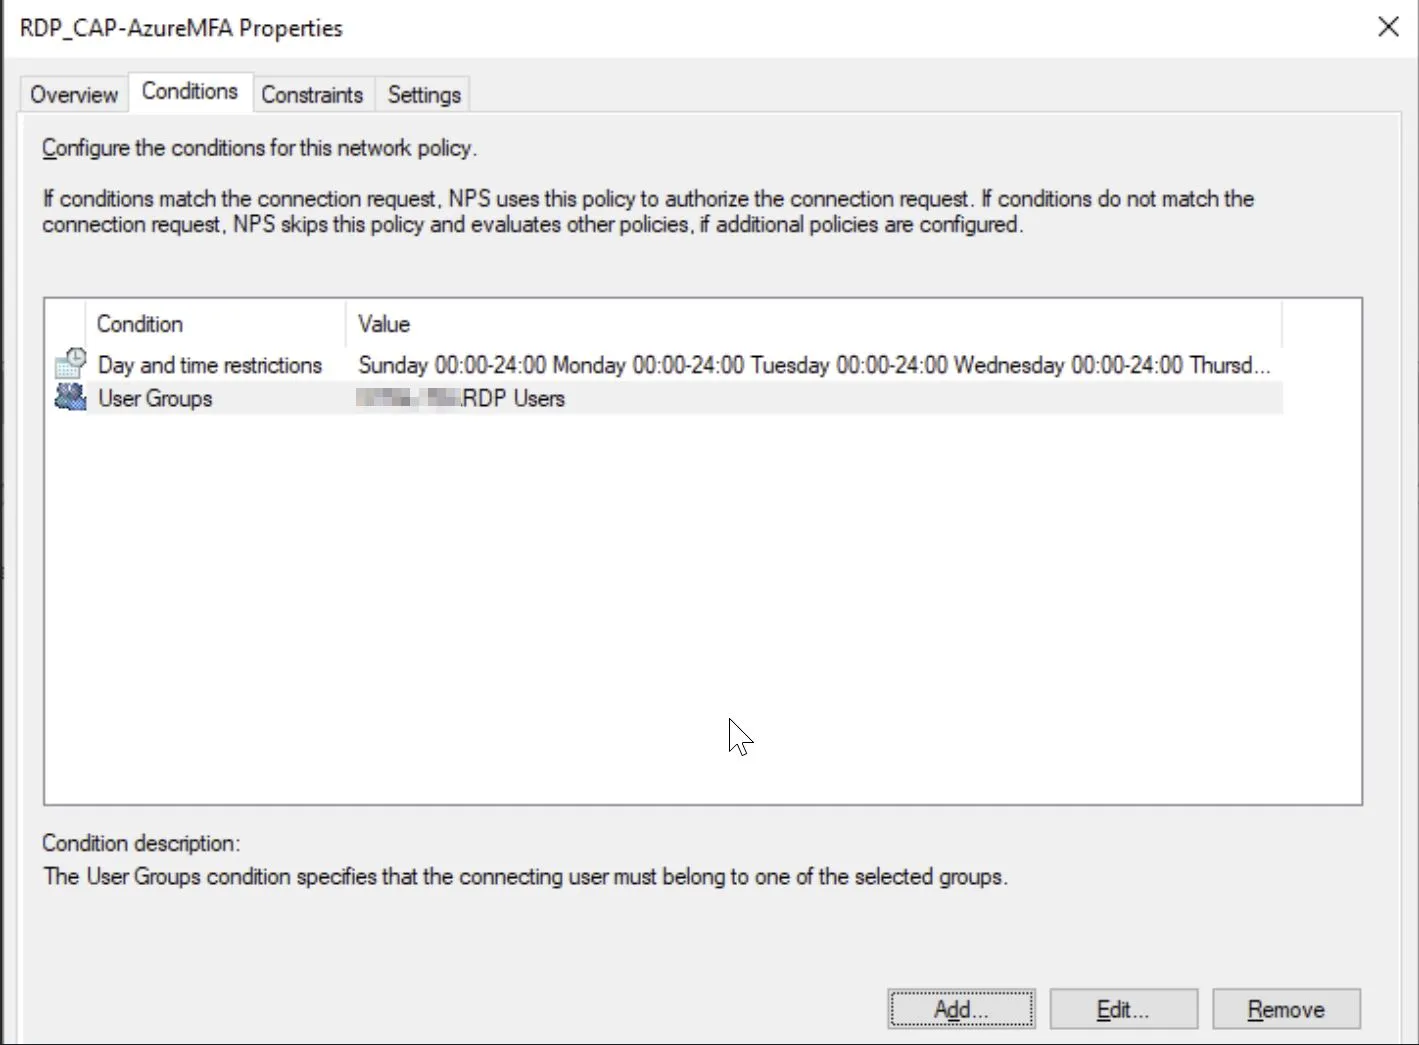
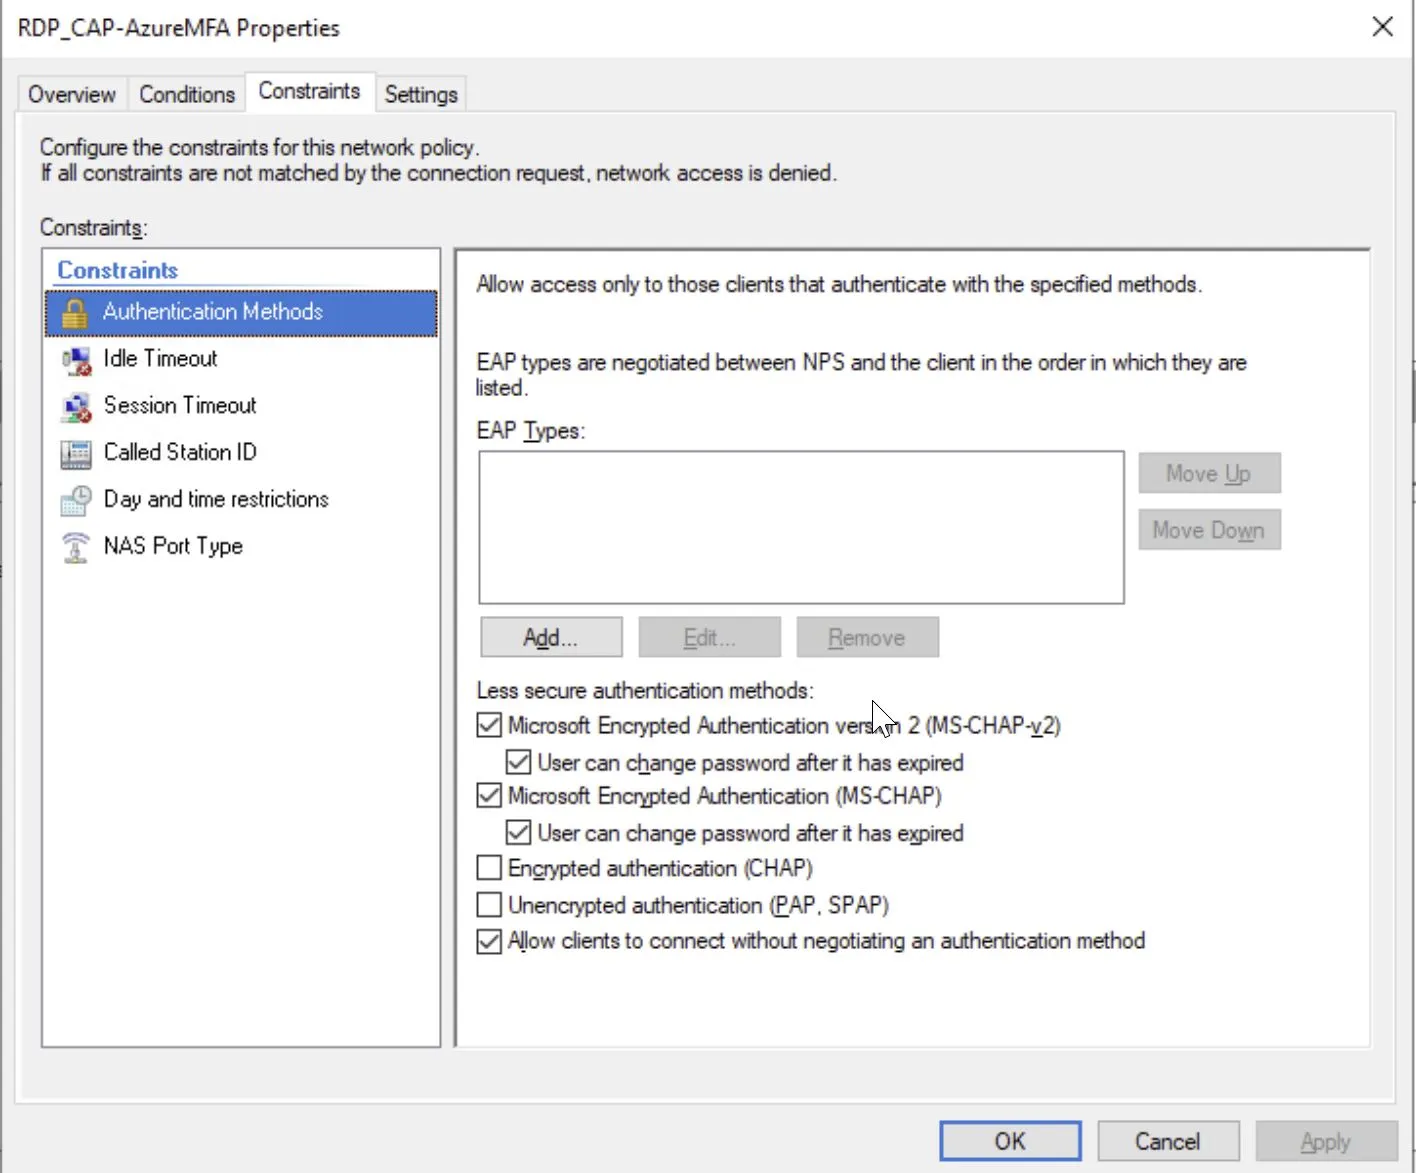
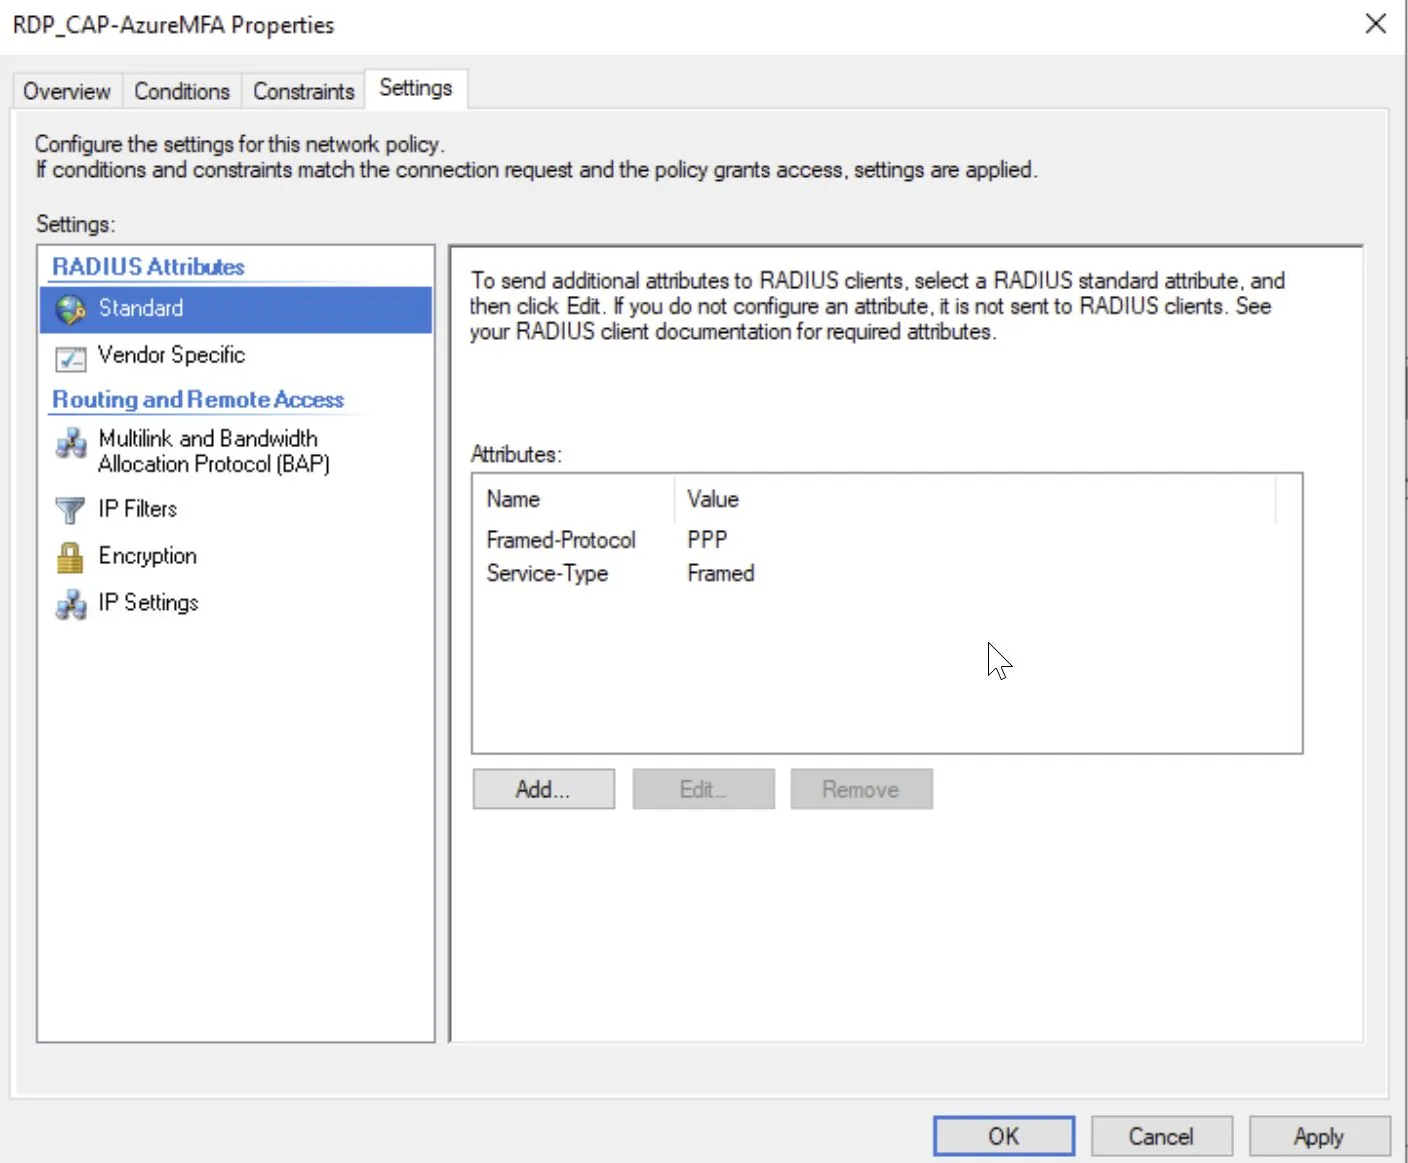
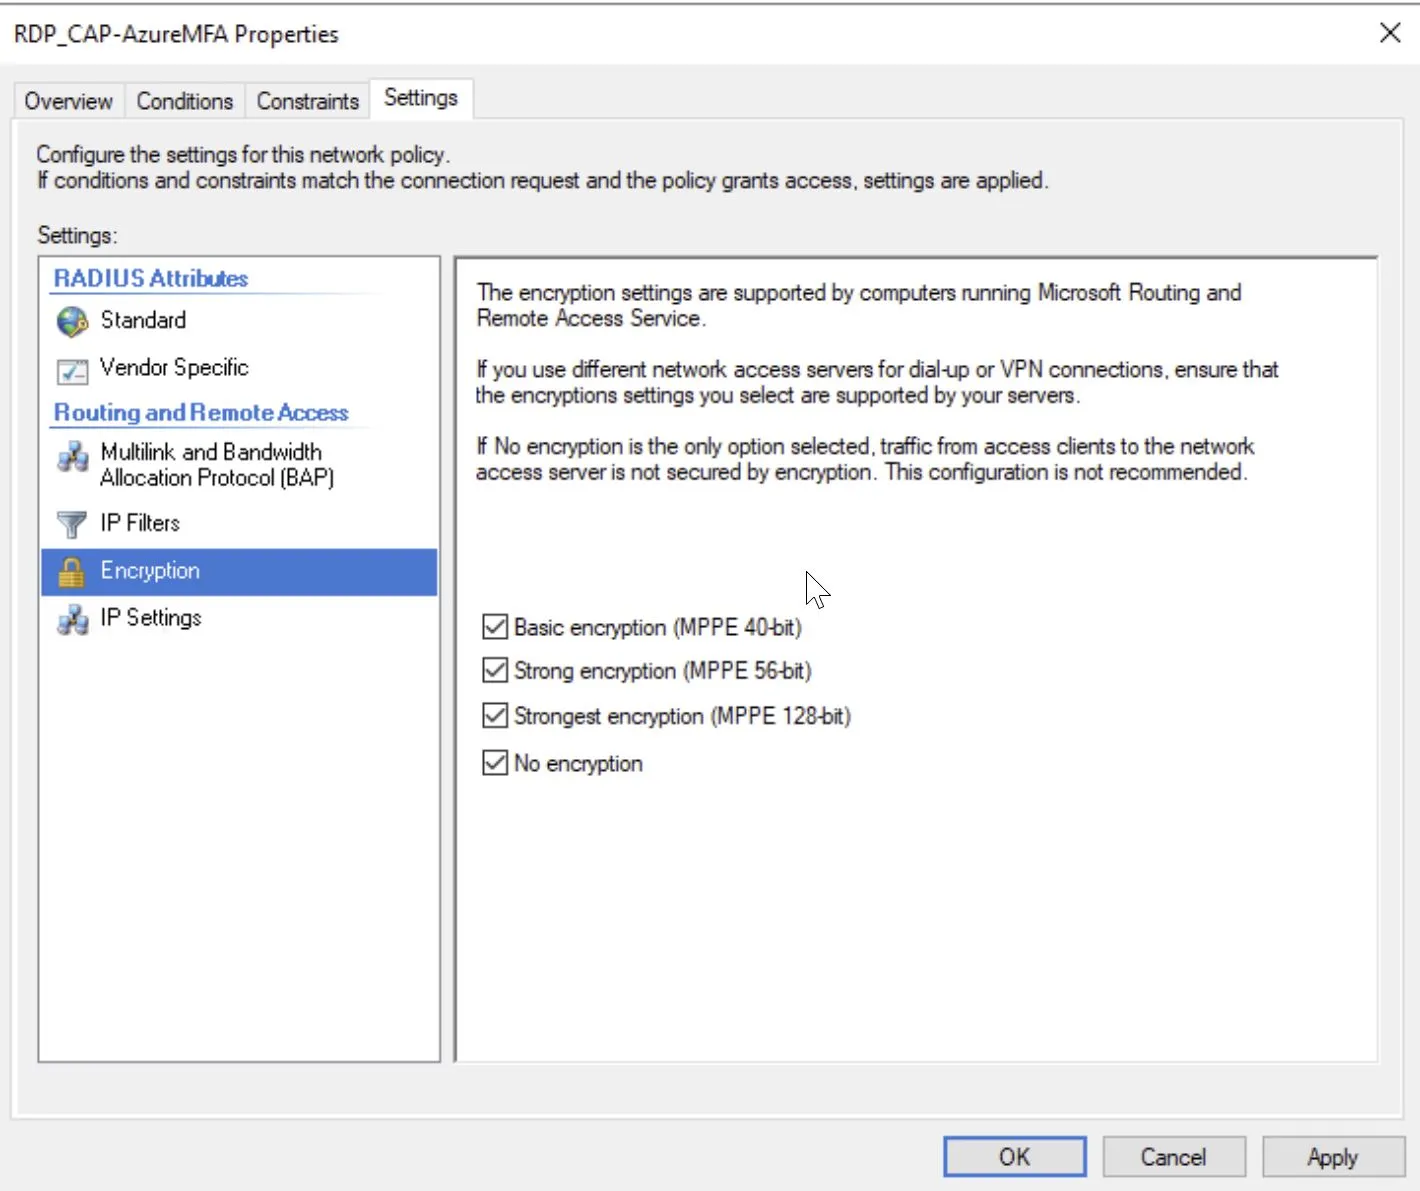
Click OK. When prompted to view the corresponding Help topic, click No.
Ensure that your new policy is at the top of the list, that the policy is enabled, and that it grants access.
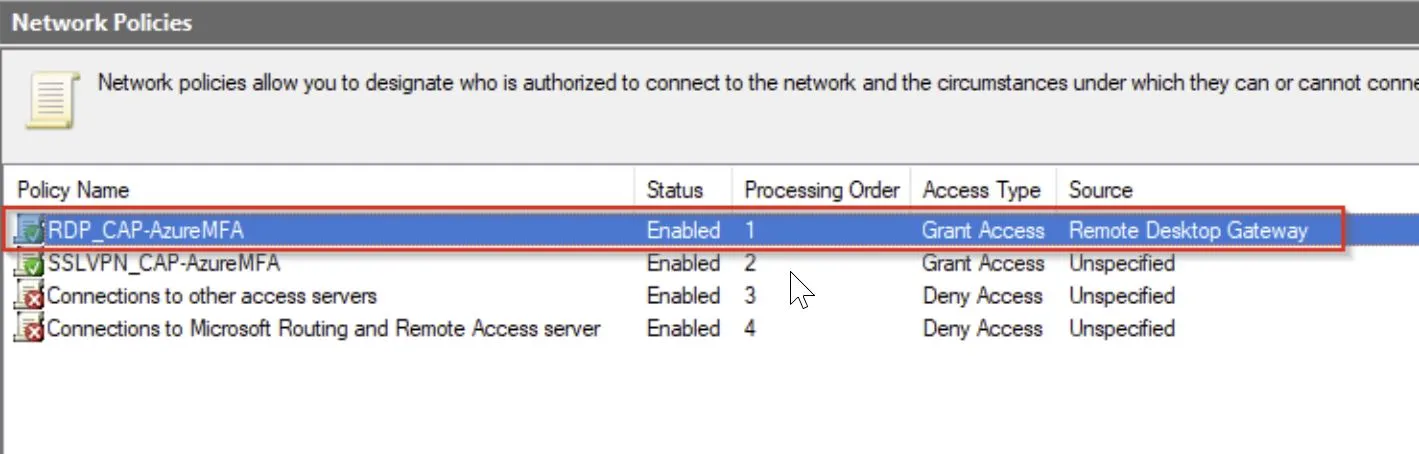
At this stage Azure MFA for RD Gateway configuration is complete.
Windows Firewall on NPS Server
During install of the NPS role the appropriate firewall rules are created to allow RADIUS traffic to the server, during our testing and after doing some research we came to the conclusion that the pre-configured rules do not work as they should so we found that you must add a manual entry for the RADIUS server ports on the NPS server.

Open Advanced Security settings
Inbound Rules
Create the below ‘New Rule’
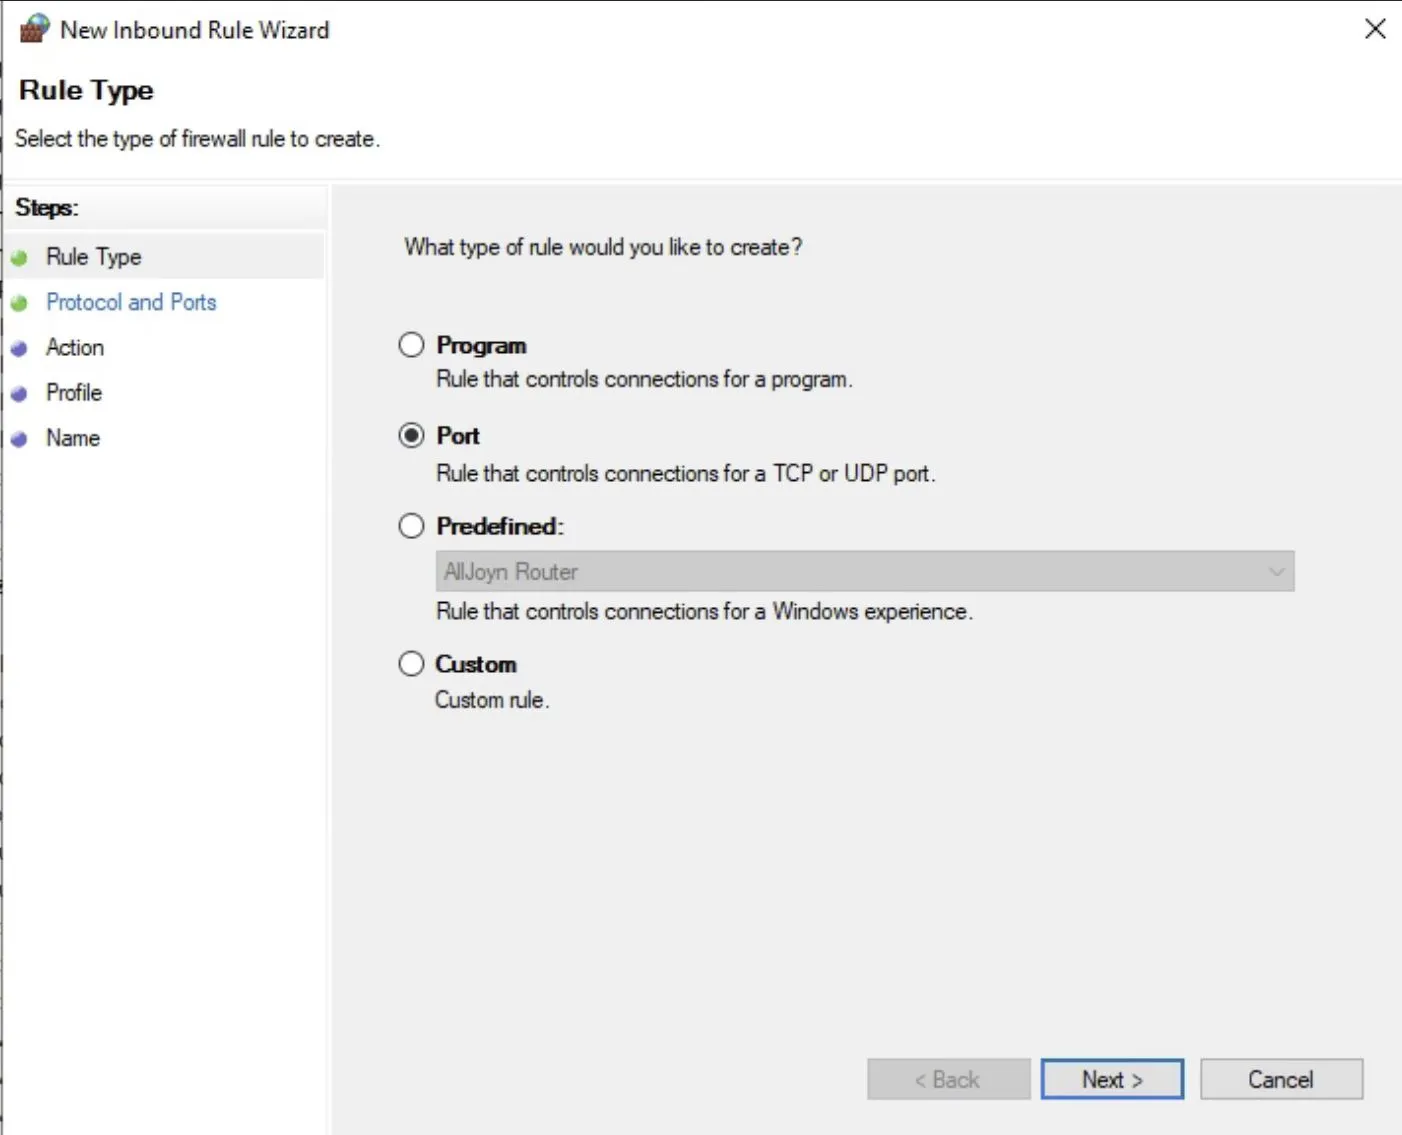
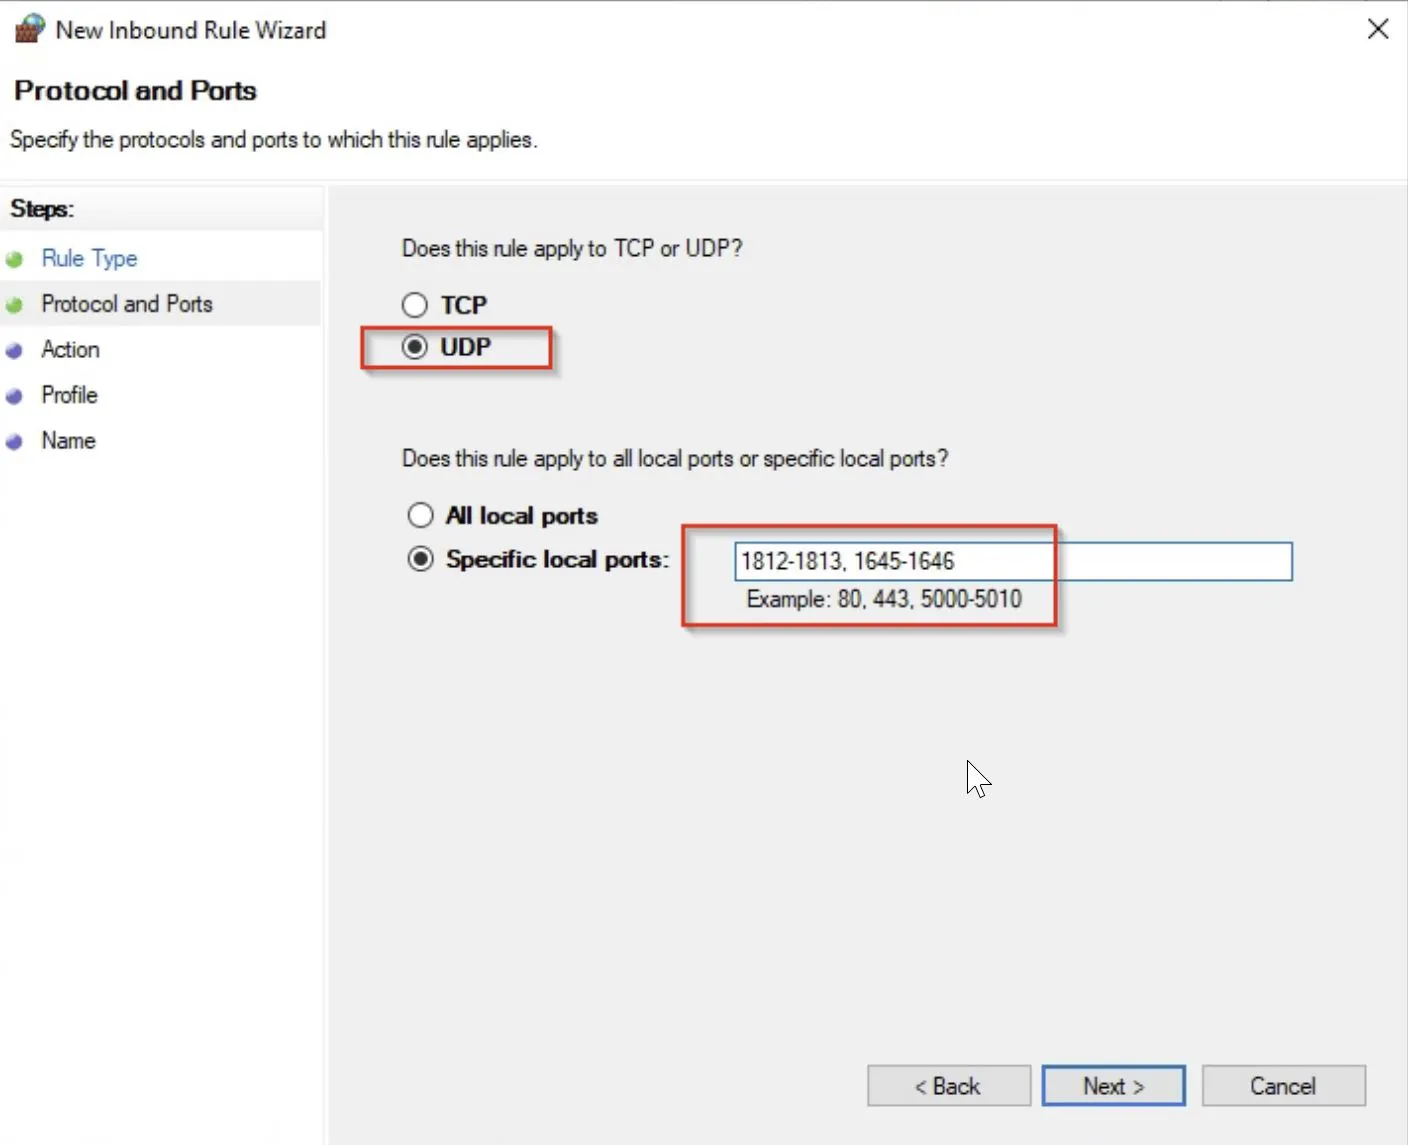
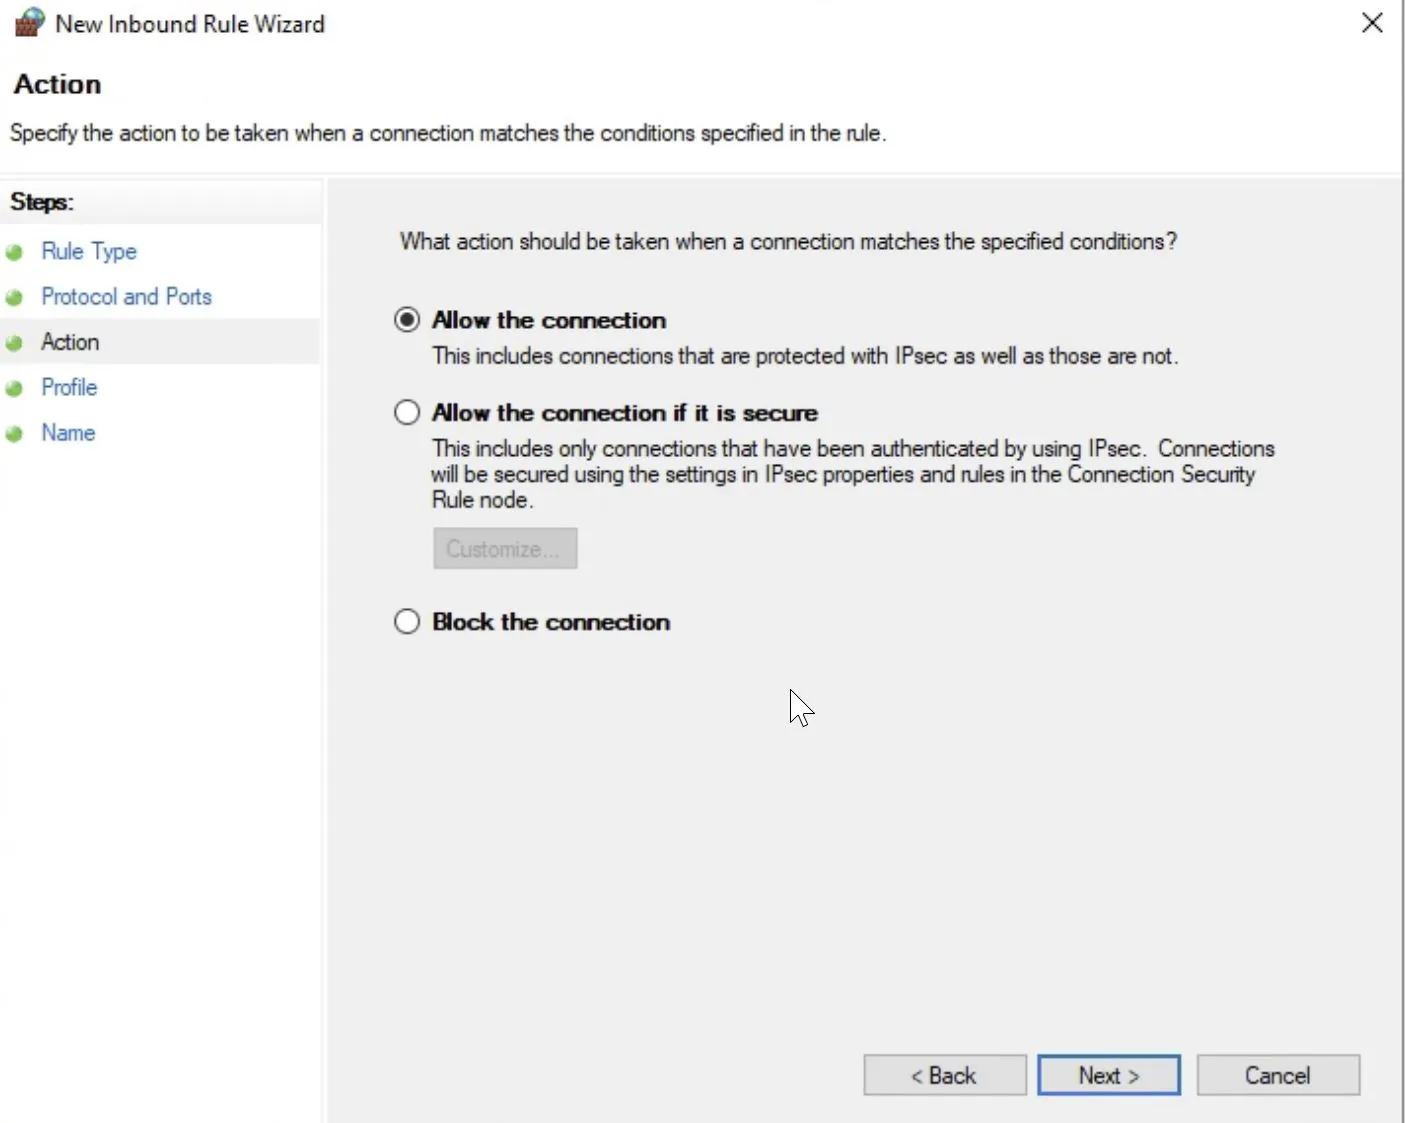
Keep in mind in these next settings I recommend only selecting Domain - Depending on your configuration you may prefer to include the Private option also; I suggest only leaving this in for testing purposes.
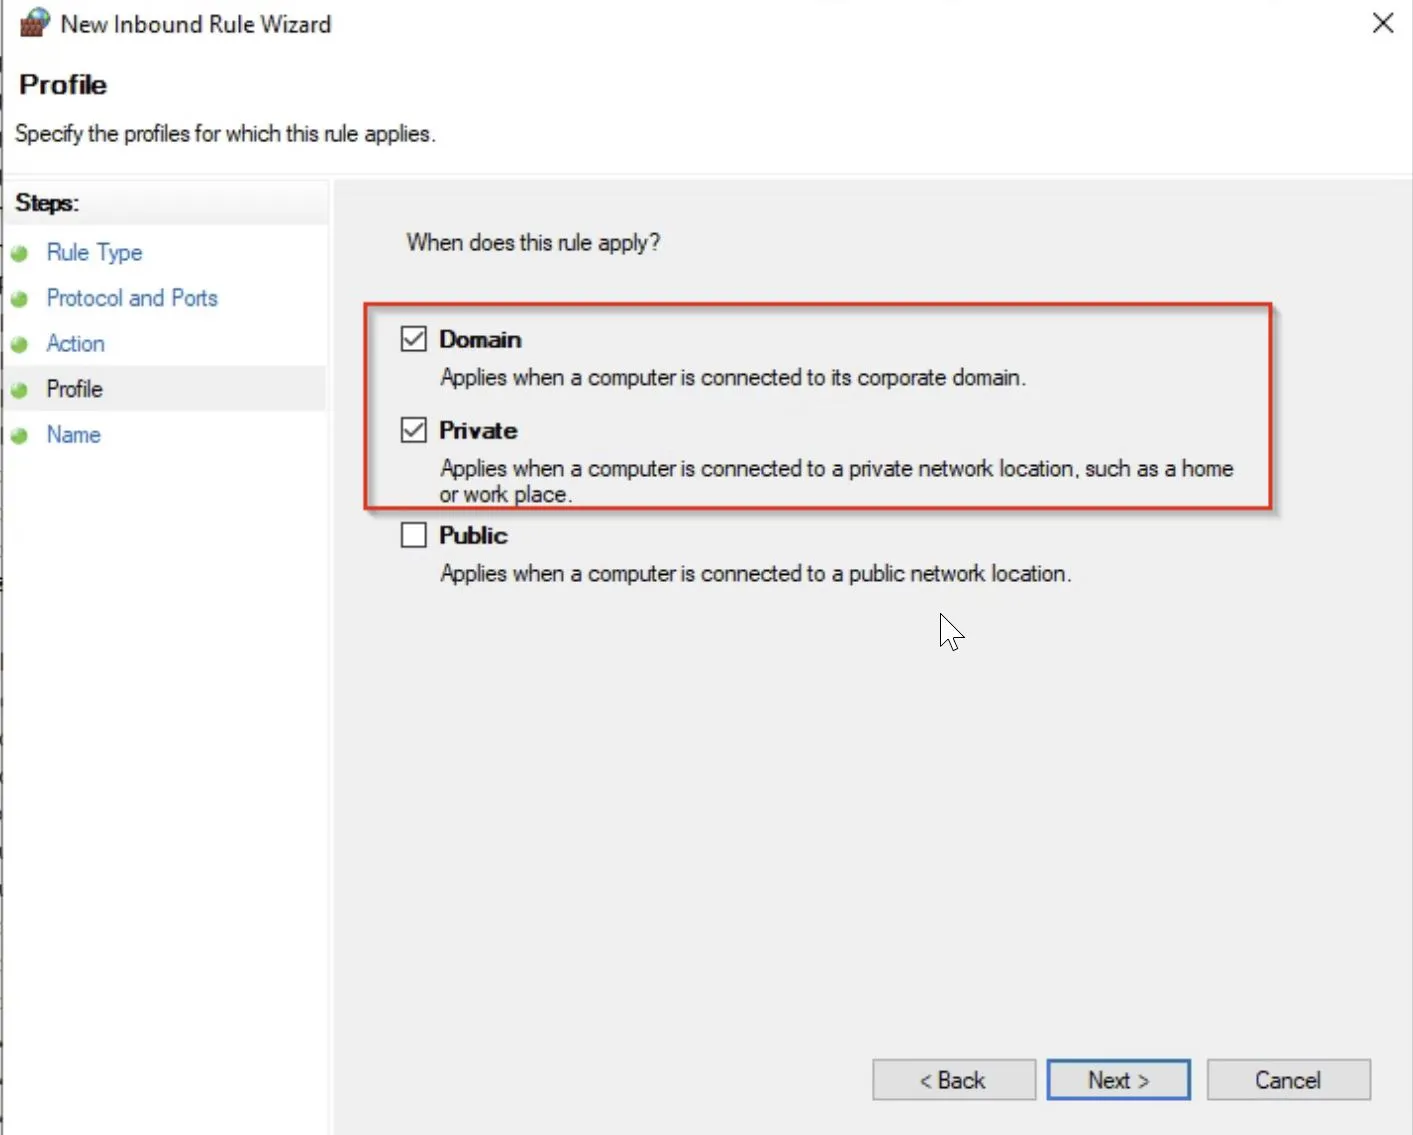
Rule name: RADIUS_Inbound
WatchGuard SSL VPN Policy for Azure MFA
Now we are going to create a new policy by right clicking the **Network Policies **folder for our firewall - In my case this is a WatchGuard using SSL VPN, I suspect similar settings would be used for the same VPN type on other firewalls, but you should do your research on this first.
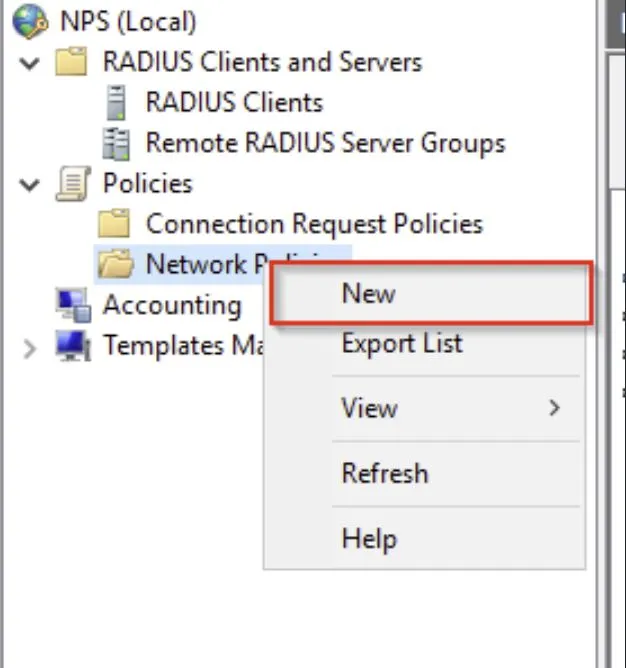
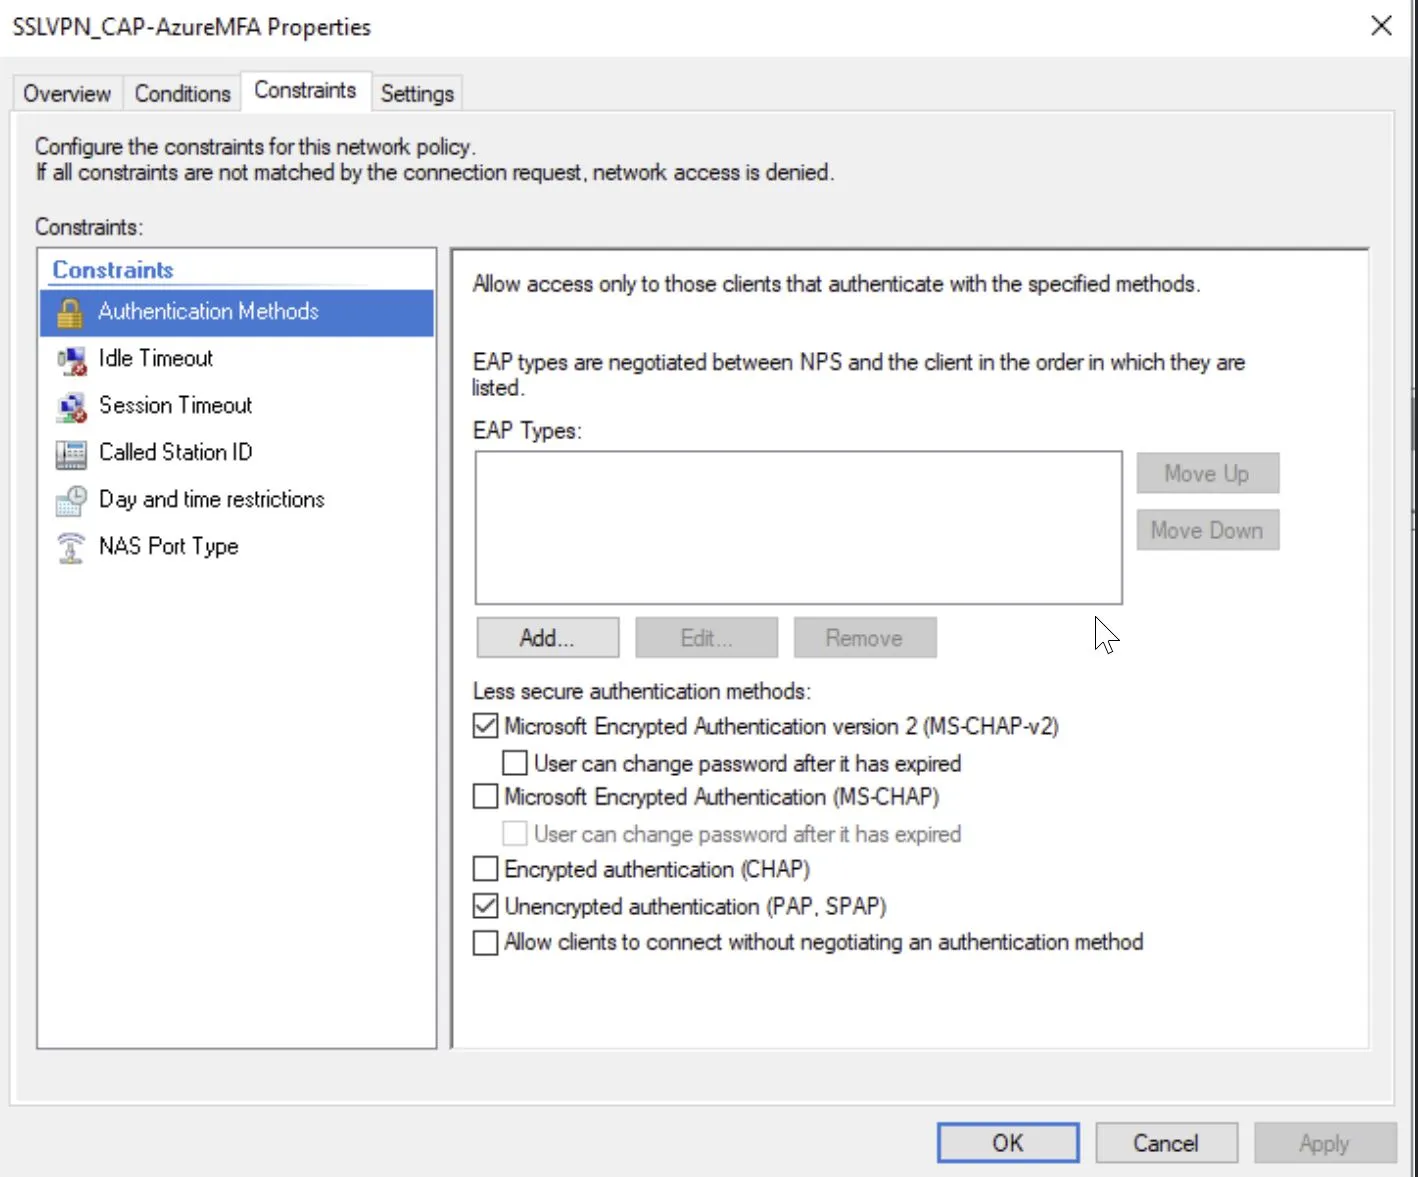
Configure the policy with the exact same settings as below. Any images not provided for a tab or setting, leave as default.
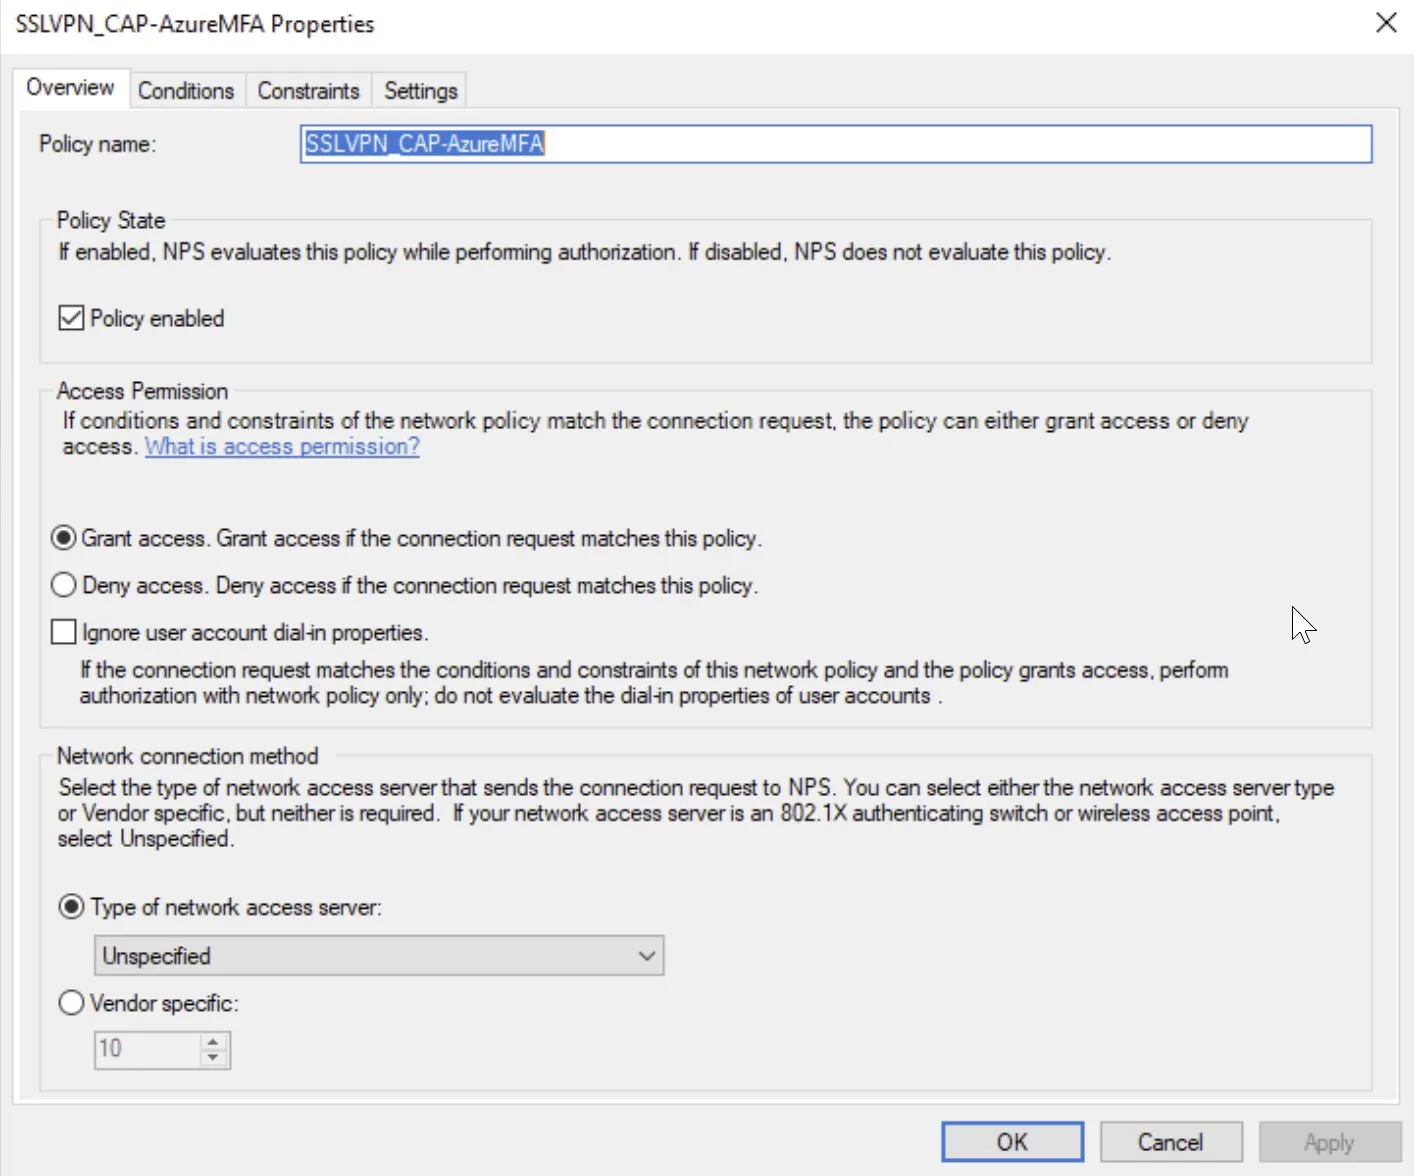
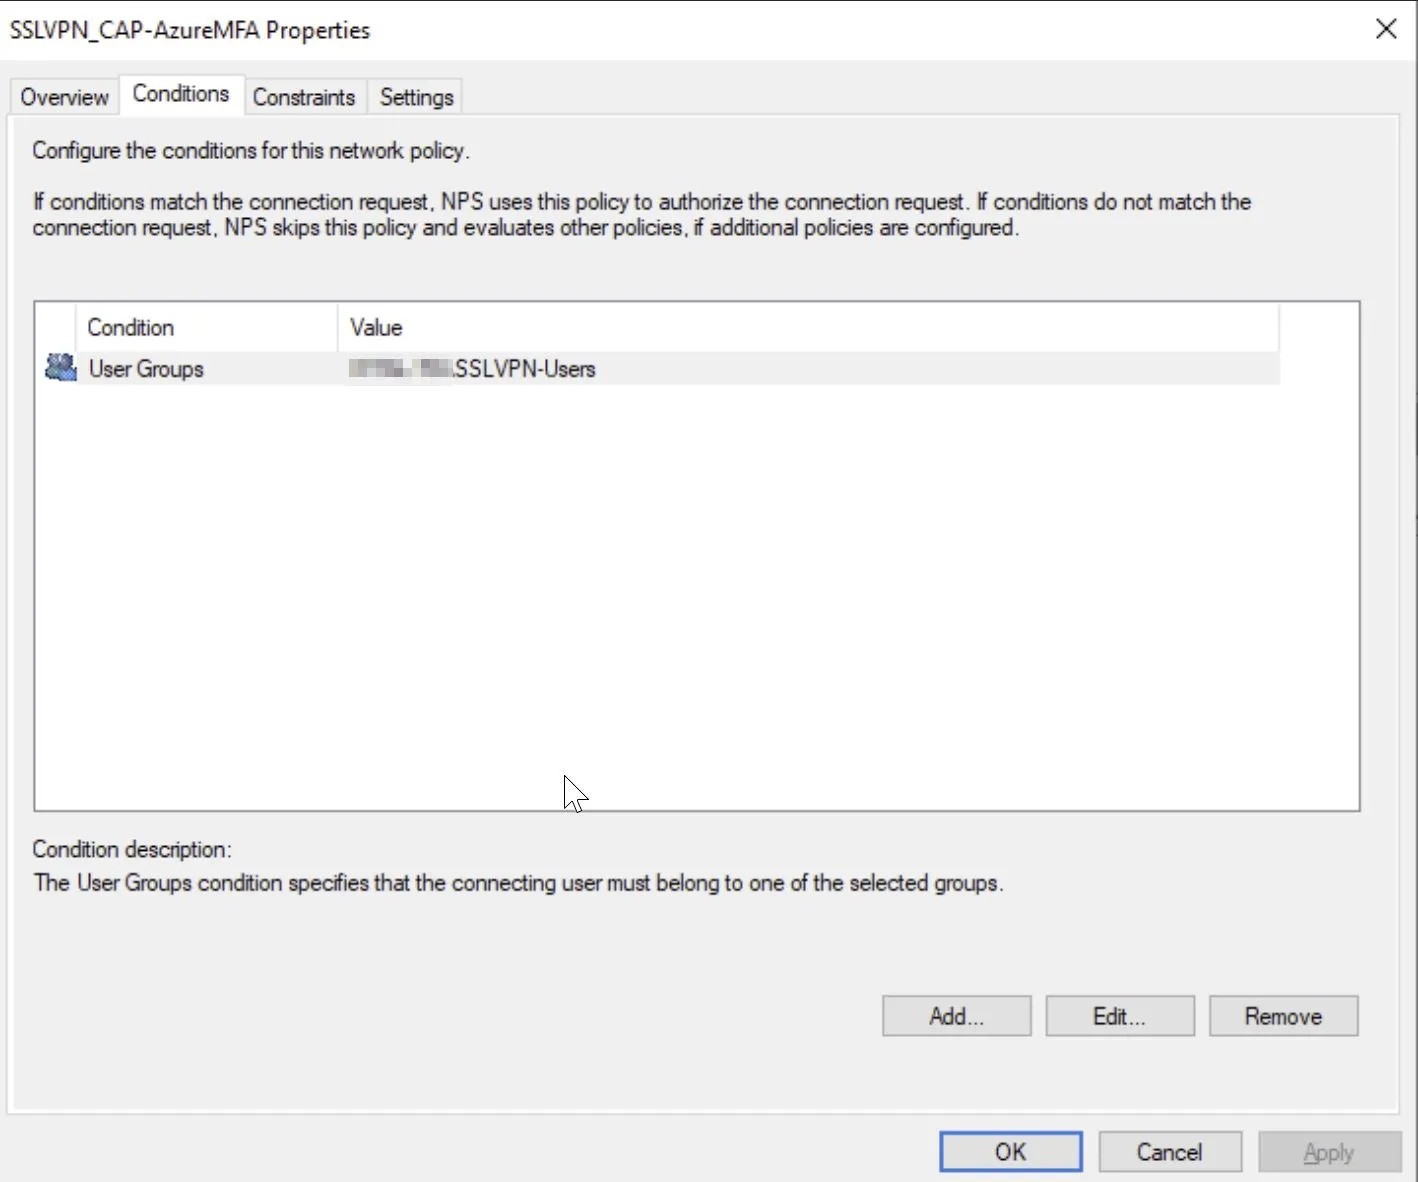
Remember to add the user group for your VPN allowed users.
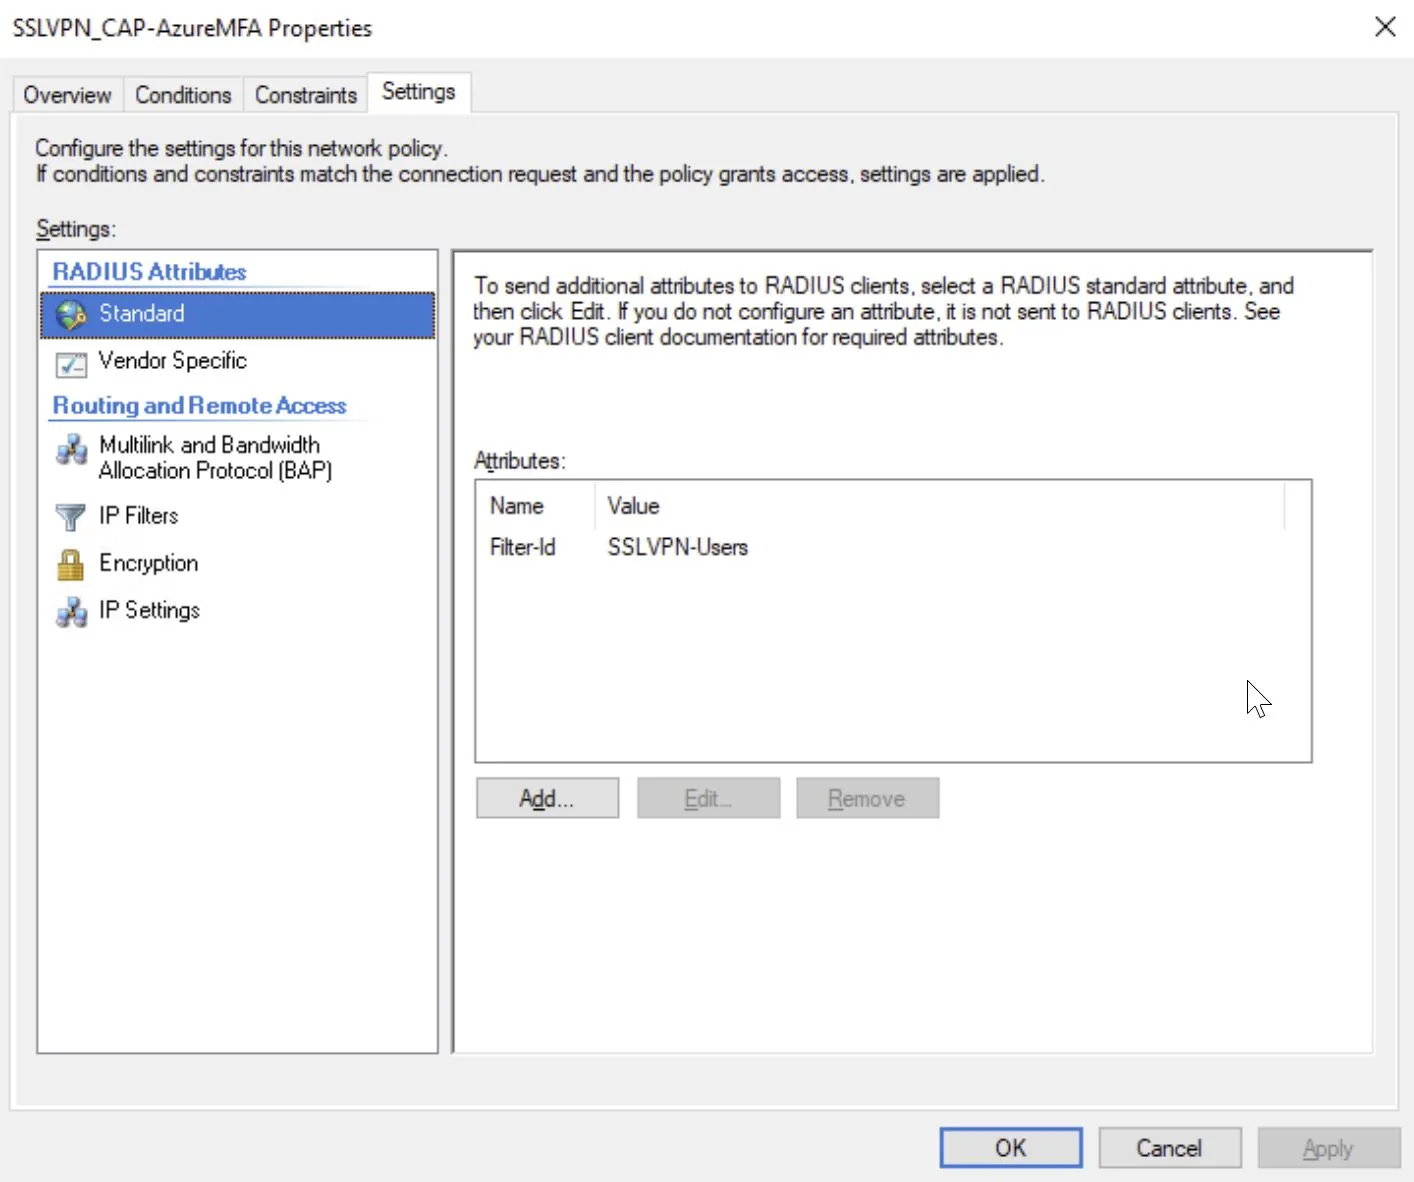
You must manually add the below Filter-Id which would be the VPN user group.
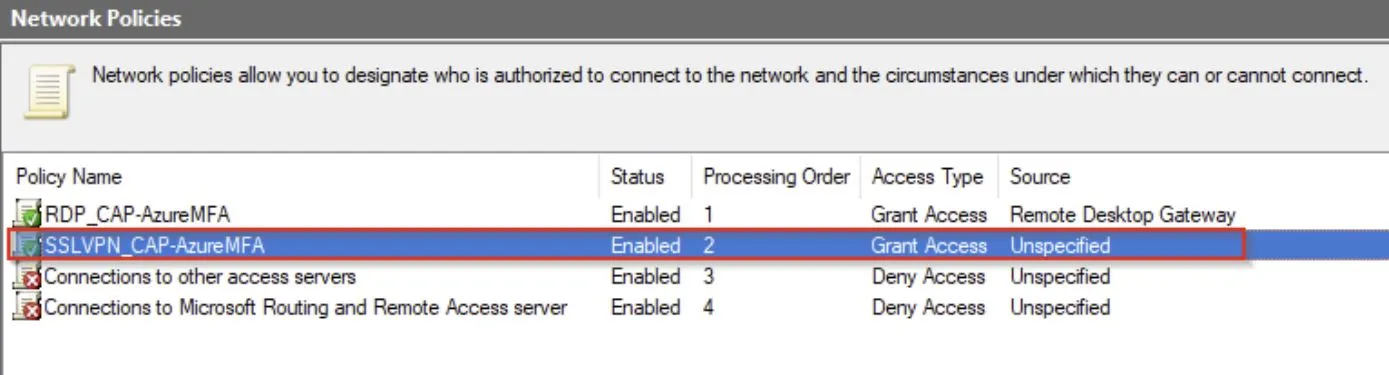
Once complete make sure the policy is second in the processing order.
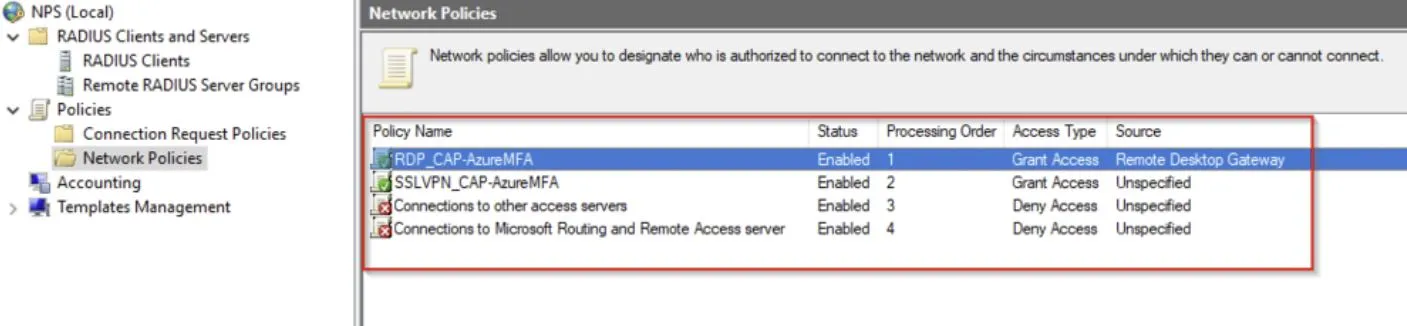
This is all that is required on the NPS Server, once RADIUS has been configured on the firewall you should be able to use the VPN with Azure MFA.
You must ensure that the policy order is as below, and you will want to set the below policies to deny, if not already.
RADIUS Configuration for WatchGuard
I will now detail the steps for setting up RADIUS on a WatchGuard firewall, you may have already done this or be using a different firewall, I suspect the steps would be similar.
In order to use Azure MFA with SSL VPN we must configure RADIUS on the WatchGuard.
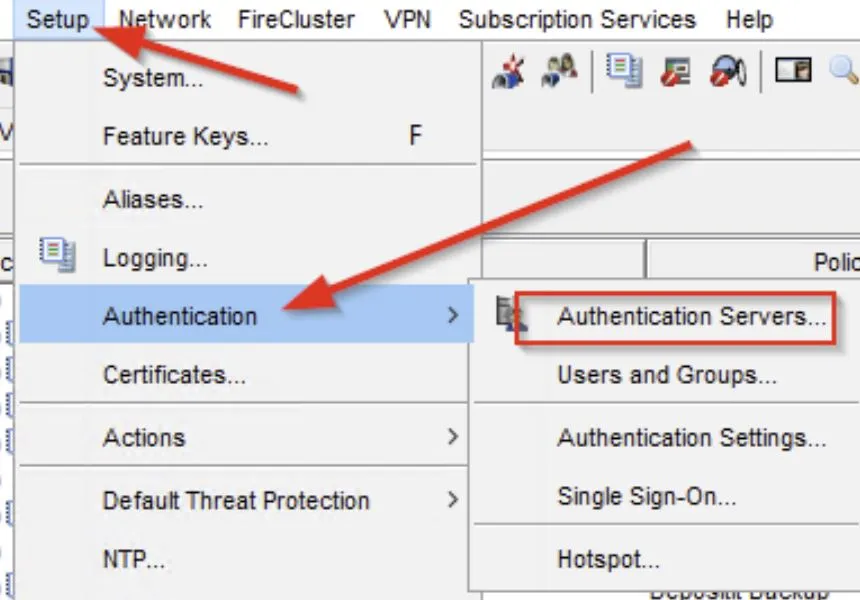
Open Policy Manager and navigate to Authentication Servers.
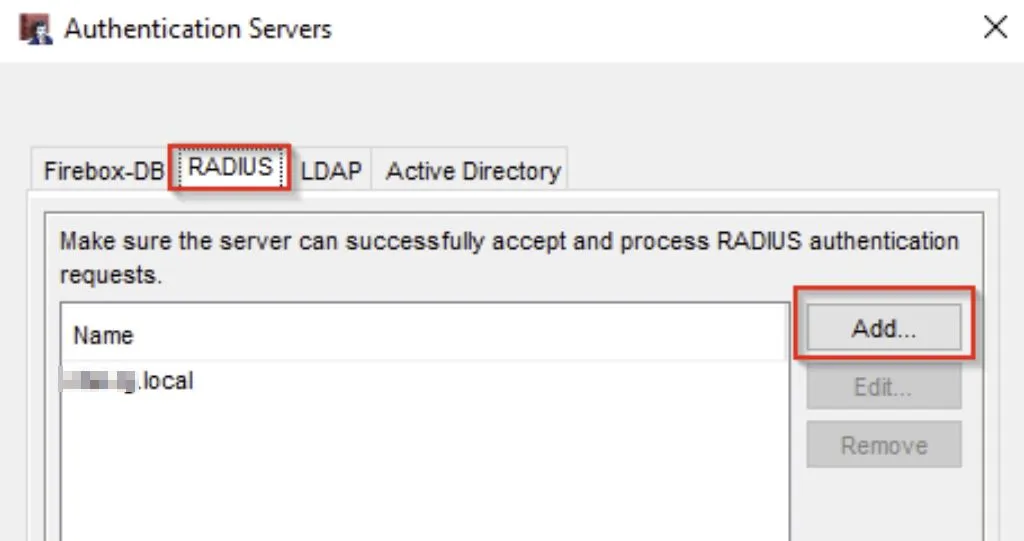
Select the RADIUS tab and then Add.
It is worth noting here that if you already have Active Directory configured you must remove that configuration and set it up using RADIUS.
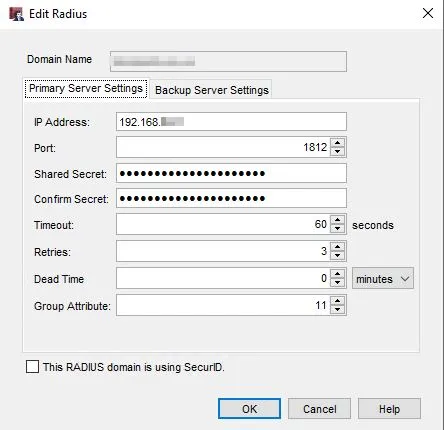
Add the relevant info in here - You can choose to use a different shared secret than that of the RD Gateway (recommended) - This should point the NPS server that has the Azure MFA NPS extension installed. Take note of the updated timeout settings.
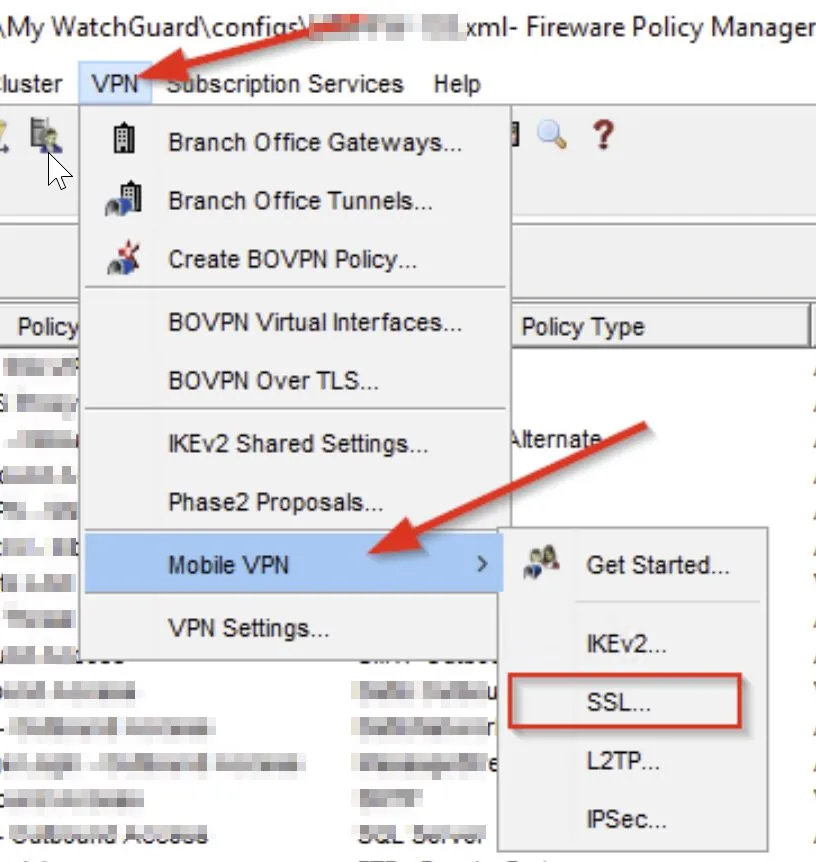
Navigate to SSL settings under VPN.
Make sure your RADIUS server is selected in the Authentication Server settings.
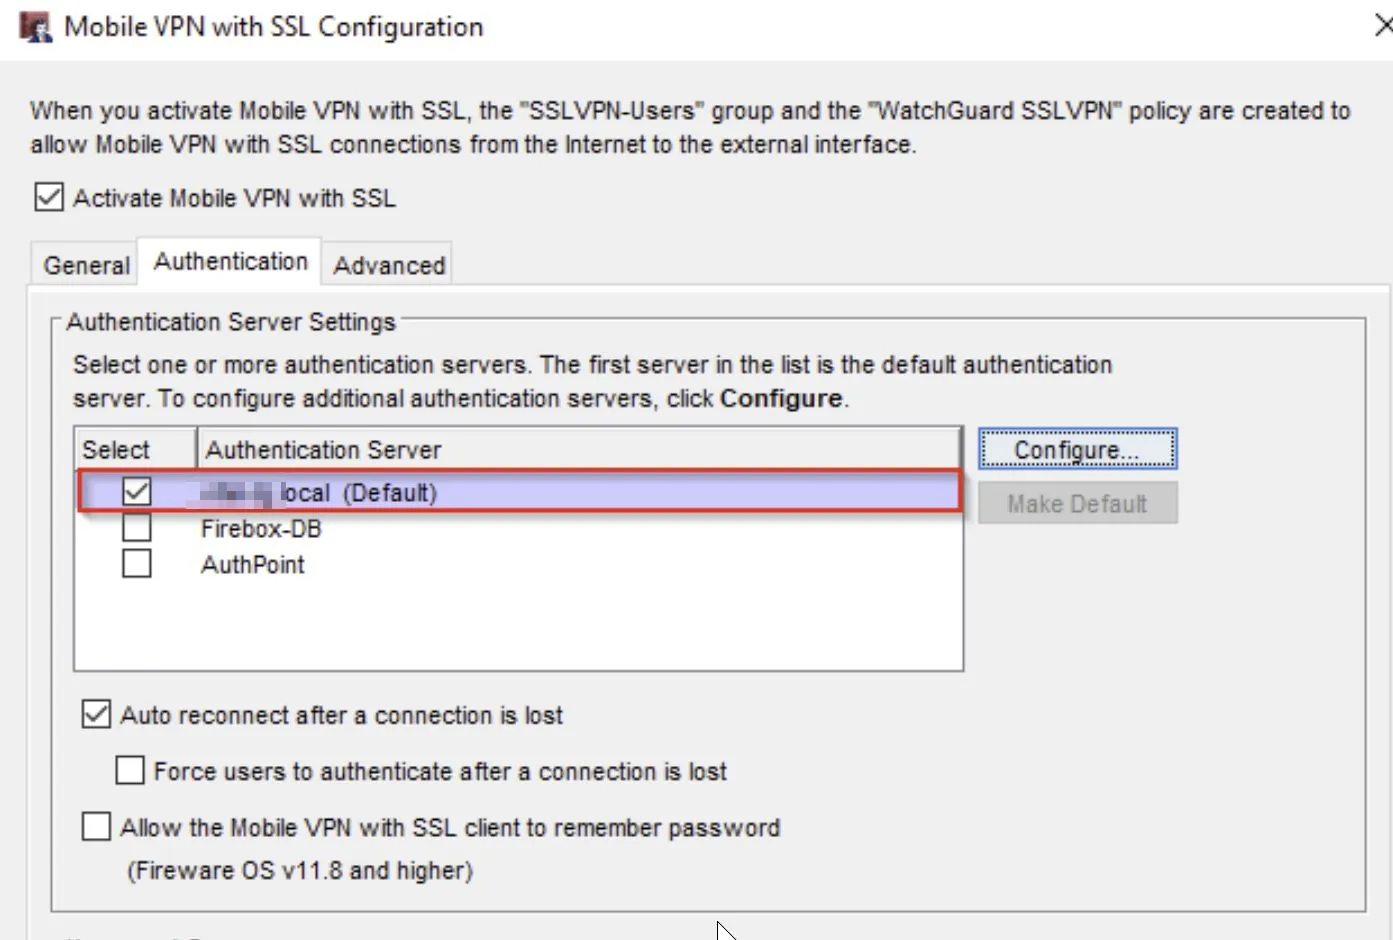
You should have already configured the firewall as a RADIUS client, if not loop back to Create and Configure RADIUS clients in this guide.
You can now test the VPN connection, if successful your test user should receive an Azure MFA push notification.
Verifying successful authentication
On the NPS server that hosts the Azure MFA NPS extension you can verify connections are successful using Event Viewer.
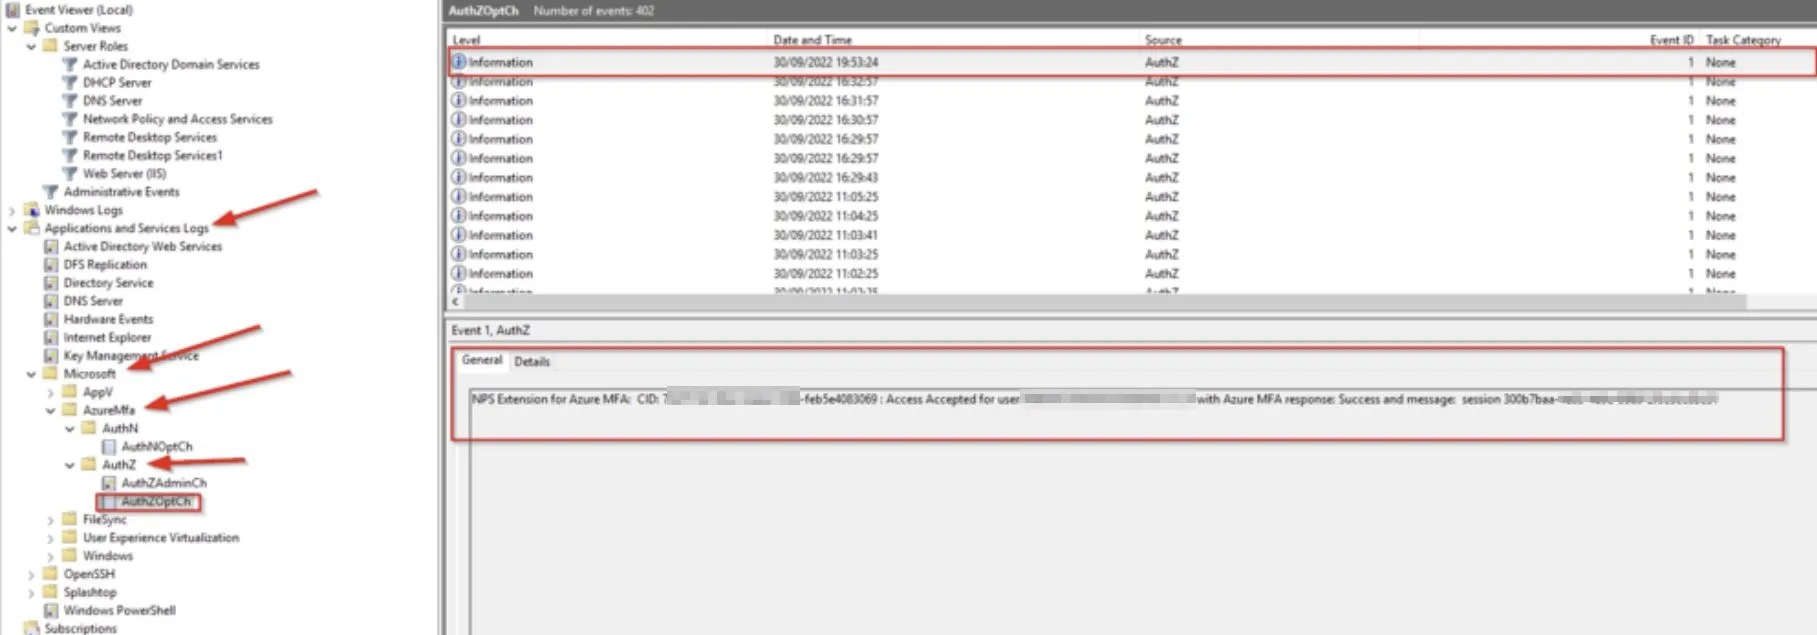
Troubleshooting
There are troubleshooting steps available in the guides linked above however a common and easy mistake to make is not having the correct shared secret in all required places, especially for the RD Gateway which requires it in three different locations.
If you are unable to authenticate to the RD Gateway using Azure MFA open Event Viewer on the RDG server and expand Custom Views -> Server Roles -> Network Policy and Access Services
If you see the below Event ID [28] this is advising you that the shared secret does match in all required locations.
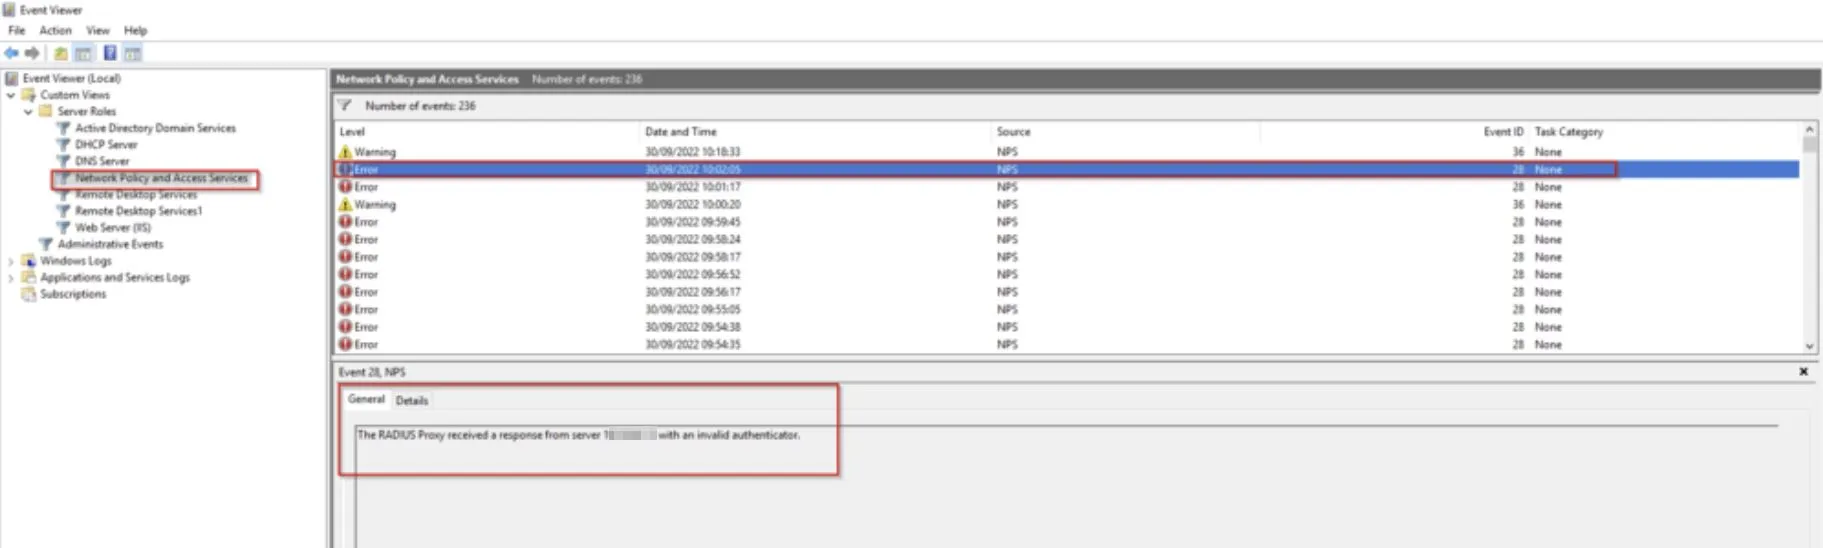
In this event loop back to RD Gateway of this guide and check your configuration.
Hope this helps with you getting Azure MFA setup for your remote connections!